
We recently announced the release of FOMO™ (Faster Objects, More Objects), a novel machine learning algorithm that brings object detection to highly constrained devices. FOMO is currently compatible with the Portenta H7 + Vision Shield, Sony’s Spresense, OpenMV, Himax WE-I Plus, Arduino Nano 33 BLE Sense with a camera, and Edge Impulse for Linux (any client).
In this example project, we have used FOMO to build an object detection model to detect the number of cars in a parking lot and deploy it on a Raspberry Pi 4. We have then compared the performance of the FOMO model with the standard SSD MobileNetV2 model.
Search for Parking Spots Inefficiencies
According to a report issued by INRIX, a leading specialist in connected car services and transportation analytics, motorists in New York alone spend an average of 107 hours a year searching for parking spots on streets, garages, and malls. The hunt adds up to an estimated $2,243 per driver in wasted time, fuel, and emissions.
Many parking solutions found in public spaces and malls use human operators to count and track the number of open spots, which is very manual and time-consuming. Parking ground vehicle detection sensors based on magnetometers, ultrasonic, and infrared sensors are some of the few commonly used options but are very expensive to install and maintain.
AI Marking Free Spots
Computer vision-based parking occupancy detection systems offer alternative parking spot monitoring solutions that are cost-effective and easily scalable as we will see in this project.
You can find the reference Edge Impulse public project here: Car Parking Occupancy Detection - FOMO. You can clone directly this project to your Edge Impulse account if you want to try it or you can follow the next steps to build it on your own:
To start, we will first create a project on Edge Impulse studio, and set the labeling method to ’Bounding boxes (object detection)’. We will then collect and annotate some images of cars in a parking lot. Since the ’car’ class is already available in YOLOv5, we can readily use the pre-trained model to make our annotation work much easier and faster. This automated annotation technique can be particularly important when working with a large number of images with classes already available in the COCO dataset. To enable this feature, we will first click the Label suggestions dropdown, then select “Classify using YOLOv5.” (See 3 Ways to Do AI-Assisted Labeling for Object Detection for more information).
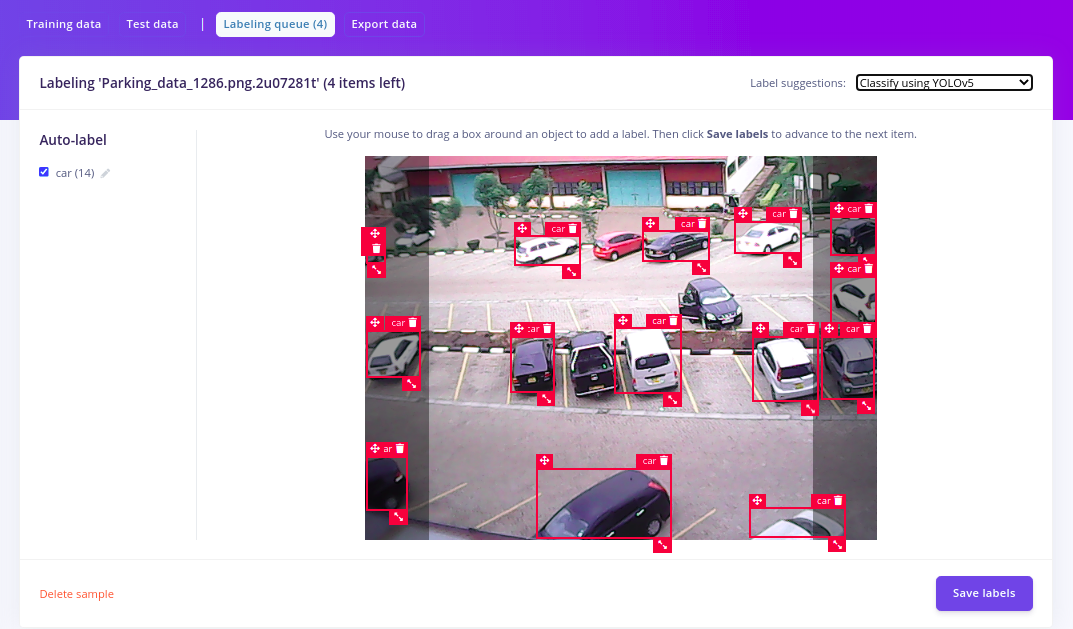
From the image above, the YOLOv5 model can already annotate more than 90% of the cars without us having to do it manually. In total, we have 114 images annotated with an 80/20 train-test split for this project.
With our dataset now fully annotated, we can now go ahead with creating and training our car detection model with FOMO. We will first set our image size to ‘160*160’ under the ‘create impulse’ section then select ‘grayscale’ under the image section. You should however note that the input image size is fully flexible and configurable depending on your target deployment device. If you are working with a resource-constrained MCU, you might want to use a lower image resolution like ‘96*96.’
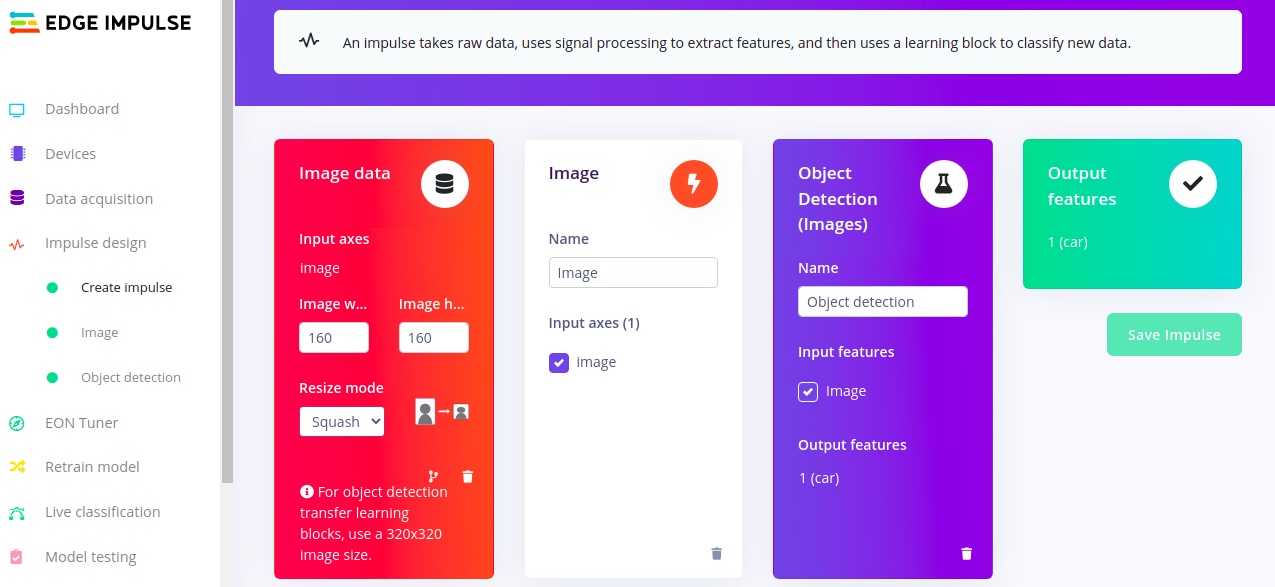
To select the FOMO model, we will head over to the ‘Object detection’ section, select ’Choose a different model’ then choose one of the FOMO models as shown in the image below.

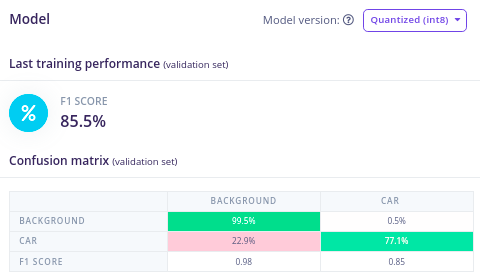
After training for 100 epochs and at a learning rate of 0.001, we get the following results as shown in the confusion matrix below.
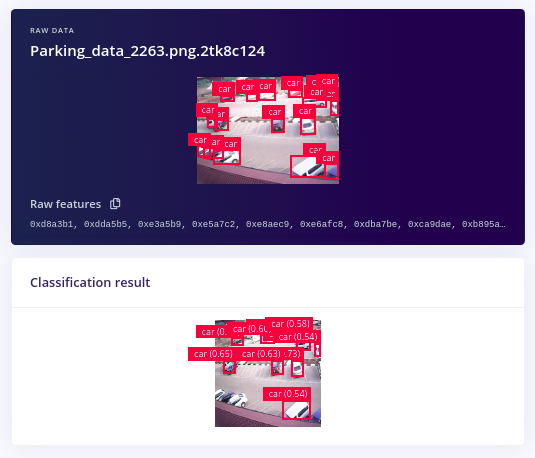
Out of the possible 17 cars in our test image below, our FOMO model was able to detect 14 of them, which is quite impressive given the few number of training images and training cycles used. For output, FOMO detects objects using centroids as compared to other traditional object detection models which give bounding boxes as outputs.
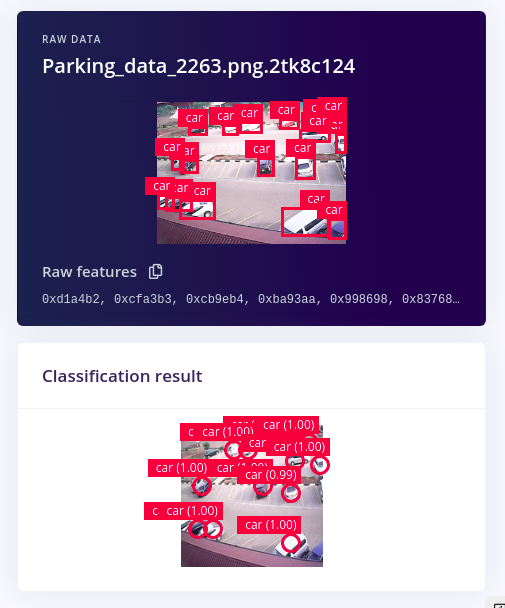
This performance can be further improved by adding more diverse data of cars at parking and retraining the model. Other techniques that might be used to increase the model performance can be found here.
To compare FOMO performance with conventional object detectors, we train an SSD MobileNetV2 model using transfer learning with the same number of epochs as the one used for FOMO.
Out of the possible 17 cars in the image, the MobileNetV2 SSD model could only identify 10 of them, four less than what FOMO could detect.
Comparison with Standard SSD MobileNet Object Detector
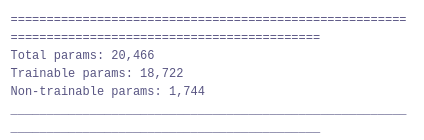
In this project, FOMO has a total of 20,466 parameters of which only 18,722 are trainable. This makes the FOMO model much smaller in size and takes less time to train compared to the standard SSD MobileNetV2.
In terms of hardware resource utilization at inference, the SSD MobileNetV2 model uses 11 MBs of flash, while FOMO uses 77KBs of flash (~142X smaller) and 243.9 KBs of RAM making it an ideal object detection architecture for MCUs targets. On live classification on a Raspberry Pi 4, the FOMO model has a latency of 36ms which equals to ~27.7 fps compared to the SSD MobileNetV2 which has a latency of 642ms ~ 1.56 fps, making FOMO ~18X faster.
Using Mean Average Precision (mAP) as the sole evaluation metric can sometimes give limited insights about a model’s performance. This is particularly true when dealing with datasets with imbalanced classes as it only measures how accurate the predictions are without putting into account the individual performance of each class. To tackle this, FOMO uses F1-Score and a confusion matrix to evaluate object detection models. F1 measures the balance between precision and recall and the confusion matrix gives an insight of how good or bad the model is for each class.
Deploying to a Raspberry Pi 4
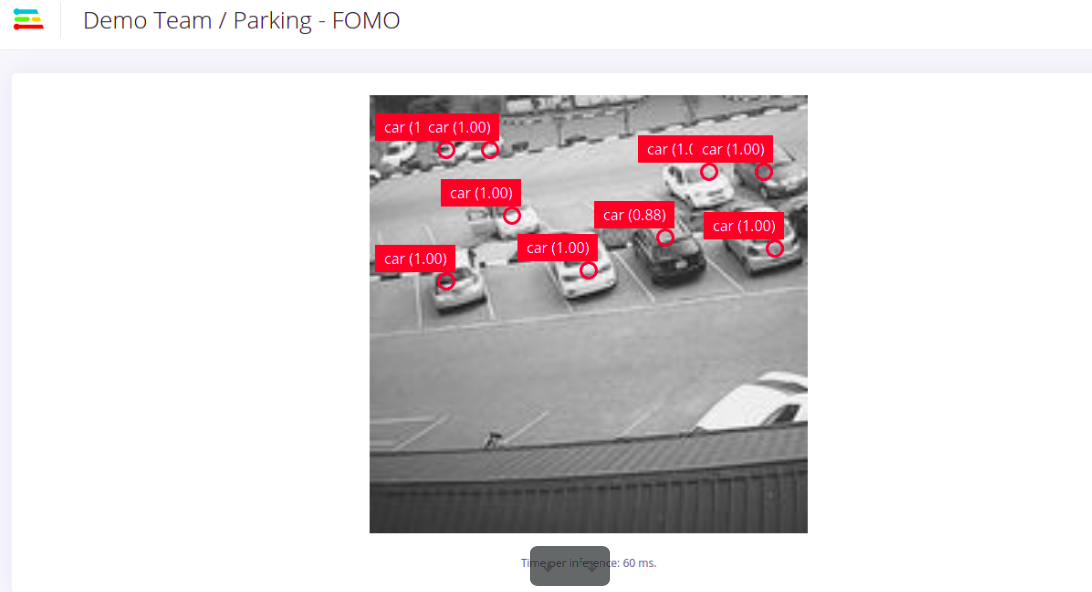
To run our trained model on a Raspberry Pi, we will first need to connect our webcam, then install all the dependencies as seen in this guide. After that, we will run edge-impulse-linux to select our project then edge-impulse-linux-runner to run our project live on camera feeds.
If you want to have a peek at what your model sees, connect your computer to the same network as the Pi and click the URL just below the ’Want to see a feed of the camera and live classification in your browser’ message on the console. Open the URL in your browser, and both the camera feed and the classification will be shown below:
Want to see Edge Impulse in action? Schedule a demo today.