
If every smart speaker streamed audio to the cloud 24/7, waiting for servers to detect "Hey Alexa." At 16 kHz, that's 77 GB per device monthly; before transcription costs, that can hit thousands of dollars per device. Network latency, privacy concerns from constant audio streaming, and the infrastructure needed to support millions of devices is not feasible.
The smarter approach, used by Amazon, Google, and many embedded AI vendors, is on-device wake-word detection. Tiny models listen locally, trigger cloud processing only when needed, and dramatically reduce bandwidth, latency, and privacy exposure.
In this guide, we’ll show how to implement a fast, reliable, on-device wake-word detector for the Rubik Pi 3 using Edge Impulse. Just say the word “Hey Rubik” and watch the device wake up and get to work, like a mini AI genie at your command.
Audio fundamentals for machine learning
Human speech is composed of phonemes (basic sound units) shaped by the vocal tract. Vowels are characterized by resonant frequencies called formants, and consonants by brief bursts or noise. To a machine, speech is a waveform that can be digitized and transformed.
- Sampling and bit depth: We digitize audio by sampling at a fixed rate. For speech, a sample rate of 16 kHz and a depth of 16 bits is typical. This captures the full voice frequency range (up to ~7 kHz) with minimal data overhead.
- Spectrograms: A key step is converting audio into a time-frequency image. A spectrogram plots frequency vs. time, showing how energy is distributed across bands. Taking a 2D view of sound lets convolutional models “see” voice patterns. Often, we use a Mel spectrogram, which applies the perceptual Mel scale to better mimic human hearing.
Real-world voice data can be messy. Background noise, cross-talk, and echoes can confuse a detector. Speaker variation (gender, age, accent, dialect) also matters indeed; studies find 66% of users report accent issues with speech systems. Robust datasets must include noise samples and diverse voices so the model learns to ignore irrelevant sounds and accents.
To summarize, we’ll record at 16 kHz/16-bit, convert each clip to Mel-frequency features (like MFCCs or MFE spectrograms), and be mindful of noise and voice variation as we train our model.
Wake word design strategy
We’ve chosen “Hey Rubik” as our wake word. A good wake word is phonetically distinct and easy to say. Designers recommend short phrases (typically 1–3 syllables) that are not common words to avoid false triggers. This is why major voice assistants typically use longer phrases.To make our wake word work, we must emphasize uniqueness and handle false positives carefully.
- Phonetic clarity: “Hey Rubik” contains a clear /h/ onset, a long vowel in Hey, and a distinctive /ruː/–/bɪk/ sequence. Multi-syllable phrases naturally create a stronger acoustic signature because the combination of consonants and vowel transitions is far less likely to occur accidentally in everyday speech. This improves separability in MFCC space and reduces overlap with casual conversation.
- Length and uniqueness: Voice-assistant guidelines consistently recommend at least two to three syllables for a reliable wake word, because longer phrases sharply reduce accidental rhymes and unintended activations. “Hey, Rubik” meets this criterion.
- False trigger handling: Even with a multi-syllable phrase, dataset construction remains crucial: we will label all speech that does not contain “Hey Rubik” as part of the “unknown” class, incorporate phonetically similar or partially overlapping phrases such as “Hey Ruby,” “Hey buddy,” and “Hey music” as hard negatives, and apply a confidence threshold (e.g., ≥0.8) so the system only accepts the wake word when it detects the complete three-syllable pattern with high certainty.
- Interaction flow: When the device detects “Hey Rubik”, it should give a brief acknowledgment such as an LED blink, chime, or screen prompt, then transition into a short listening window for the actual command. Although this guide focuses on wake-word detection alone, in a real system, this would feed into command recognition or a downstream natural language processing (NLP) module.
In short, “Hey Rubik” is an ideal wake word: multi-syllabic, phonetically distinctive, and unlikely to appear in normal conversation. Because of these advantages, it reduces the risk of false triggers and simplifies the training process.
Implementation
In this section, we will see how to develop a wake-word model in Edge Impulse. First, we will set up an Edge Impulse on the Rubik Pi 3.
Setting up Edge Impulse on the Rubik Pi 3
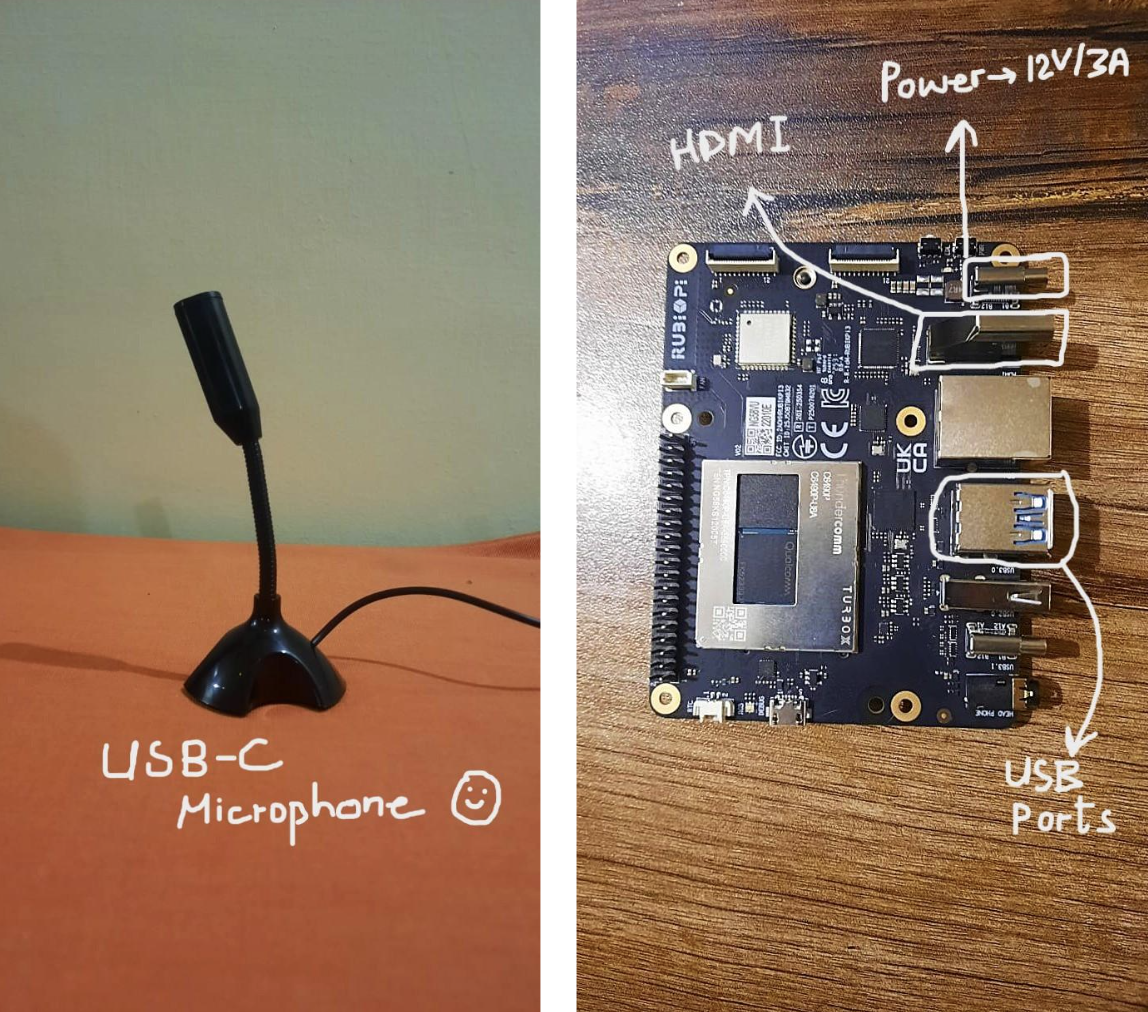
In our workflow, Rubik Pi 3 will be used to collect microphone data and perform on-device inference. We have attached a simple USB microphone that’s compatible with the Raspberry Pi. Here’s all the equipment used:
Below is the setup process for installing the Edge Impulse Linux CLI on the Rubik Pi 3 so it can receive compiled models and run inference locally.
1. Preparing the Rubik Pi 3
If your Rubik Pi 3 is running Ubuntu 24.04, connect a USB keyboard, a USB microphone, and an HDMI display, then power it via the right-side USB-C port and press the front power button. When the console appears, sign in using ubuntu for both the username and the password.
If your device is not running Ubuntu 24.04, refer to the official Thundercomm Rubik Pi 3 instructions provided in the Edge Impulse documentation.
2. Installing the Edge Impulse Linux CLI
Once your Rubik Pi 3 is online and rebooted, install the required dependencies:
This installs Node.js, audio/GStreamer utilities, build tools, and the Edge Impulse CLI itself.
3. Connecting your Rubik Pi 3 to Edge Impulse
Run the device agent:
A setup wizard will appear, prompting you to:
- Log in to your Edge Impulse account
- Select your project
- Configure the data source (microphone, camera, etc.) if needed
We will use this after creating the model. If you ever need to reset the configuration or switch projects, run:
Since our wake-word project only requires audio input, you can start the Edge Impulse agent with the camera disabled:
Next, verify that your Rubik Pi 3 is using the correct microphone. List all audio capture devices with:
This will display the available sound cards and device numbers, e.g.,
card 1: Device [USB Microphone], device 0: subdevice 0.
Once you know the correct device, update the Edge Impulse configuration to use it:
In the JSON file, set the "audio_device" field to match your microphone, for example:
Save the file and restart the agent. The Edge Impulse runner will now capture audio from the correct microphone for live inference or data acquisition.
4. Verifying device connection
Open your project in Edge Impulse Studio → Devices. You should now see your Rubik Pi 3 listed as an active Linux target.
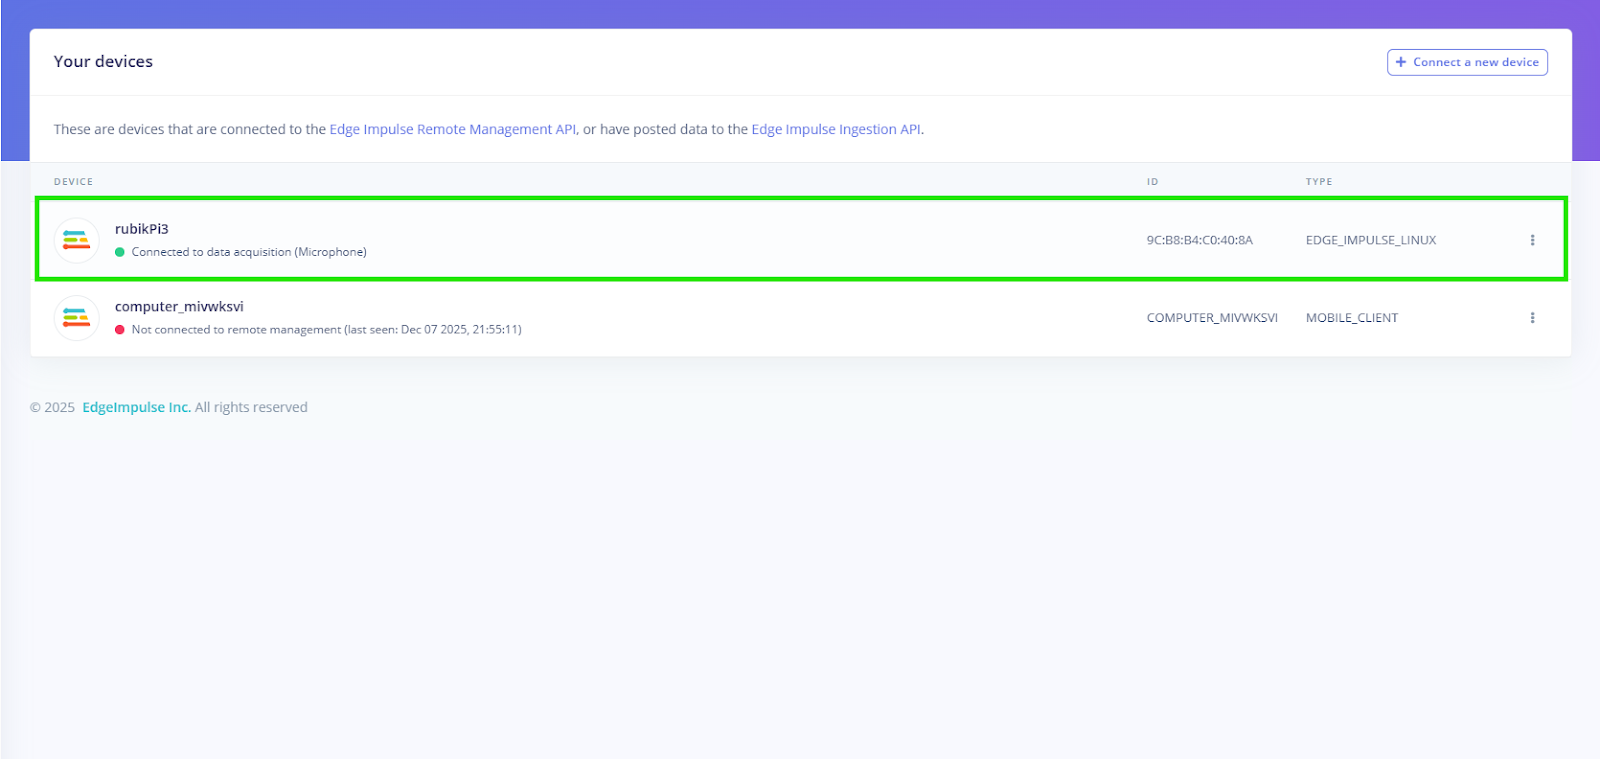
Once this is complete, your board can receive impulse bundles, run real-time inference, and act as the deployment target for your wake-word detection pipeline.
Edge Impulse project setup and configuration
First, create a new Edge Impulse project in the Edge Impulse Studio.
Once set up, open the Data acquisition tab in the Studio. Here, you define how to record samples from your device.
For example, to record a 2-second clip:
- Once the device is detected, go to the Data Acquisition tab to start sampling audio from the microphone.
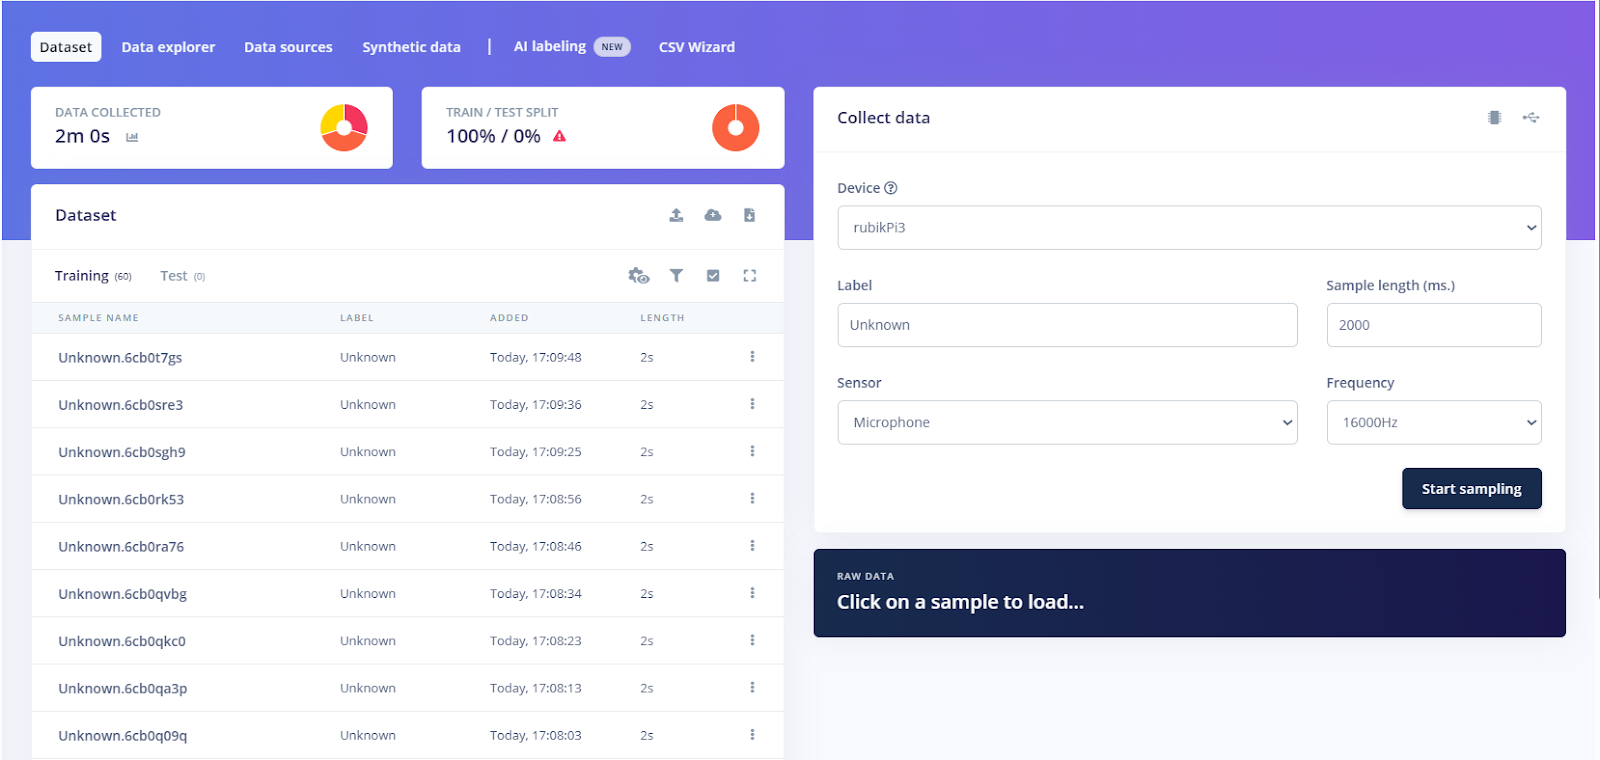
- Choose the sensor, Built-in microphone, or USB microphone depending on your setup.
- Set Label to Rubik (for our wake word) and set Sample length to 2000 (milliseconds).
- Click Start sampling and speak “Hey Rubik” clearly for one second.
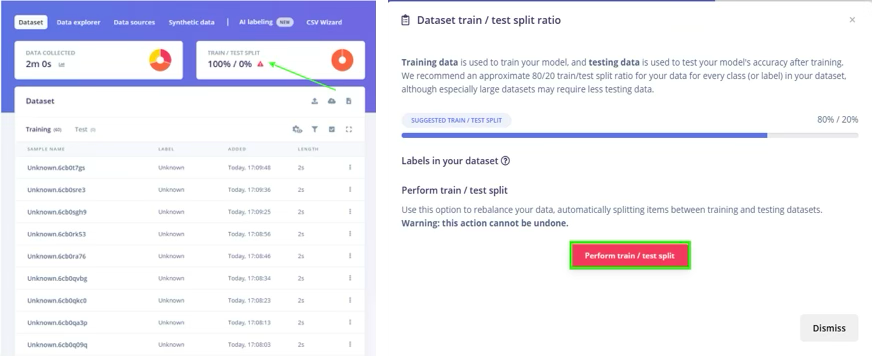
- Once the recording is complete, you can divide the dataset into training and testing sets.
After recording, Edge Impulse uploads the clip and displays its waveform in the Data Acquisition tab. You should see a new entry in the Collected data labeled Rubik. Repeat this multiple times to gather many examples. The Live Classification feature in Edge Impulse (EI) also lets you stream continuous audio and cut out windows in real time.
Building your voice dataset
A high-quality dataset is key. We want “Hey Rubik” utterances from many speakers, plus lots of negative examples.
- Recording setup: Use the same microphone and setup for all recordings. Keep ambient noise consistent. Mark the microphone at a fixed distance. Use headphones for playback tests to avoid feedback.
- Positive samples: Have several people (different genders, ages, accents) say “Hey Rubik” many times. Aim for at least a few minutes of total wake-word data. For example, record 10 people * 30 utterances * 1s = ~5 minutes. This diversity helps the model generalize. For our demo, we will be casual about it.
- Negative samples: Create at least two “background” classes:
- unknown (other speech): For example, random sentences, other words like “hi”, “bye”, or similar words.
- noise: Pure ambient or environmental sounds (TV, fan, street noise). Realistic background audio trains the model to ignore non-voice.
- Duration: Aim for the negative classes to be roughly as large as the positive data (balanced classes).
- Labeling: In Edge Impulse’s Data acquisition, label each recording appropriately (rubik, unknown, noise). You can upload files via the Upload portal or use the CLI to label bulk data.
By mixing speakers, venues, and microphone placements, the dataset will cover real-world variation.
Signal processing pipeline design
With data in hand, we configure the Impulse Design. Edge Impulse uses a two-stage model: a processing block (feature extraction) and a learning block (neural network).
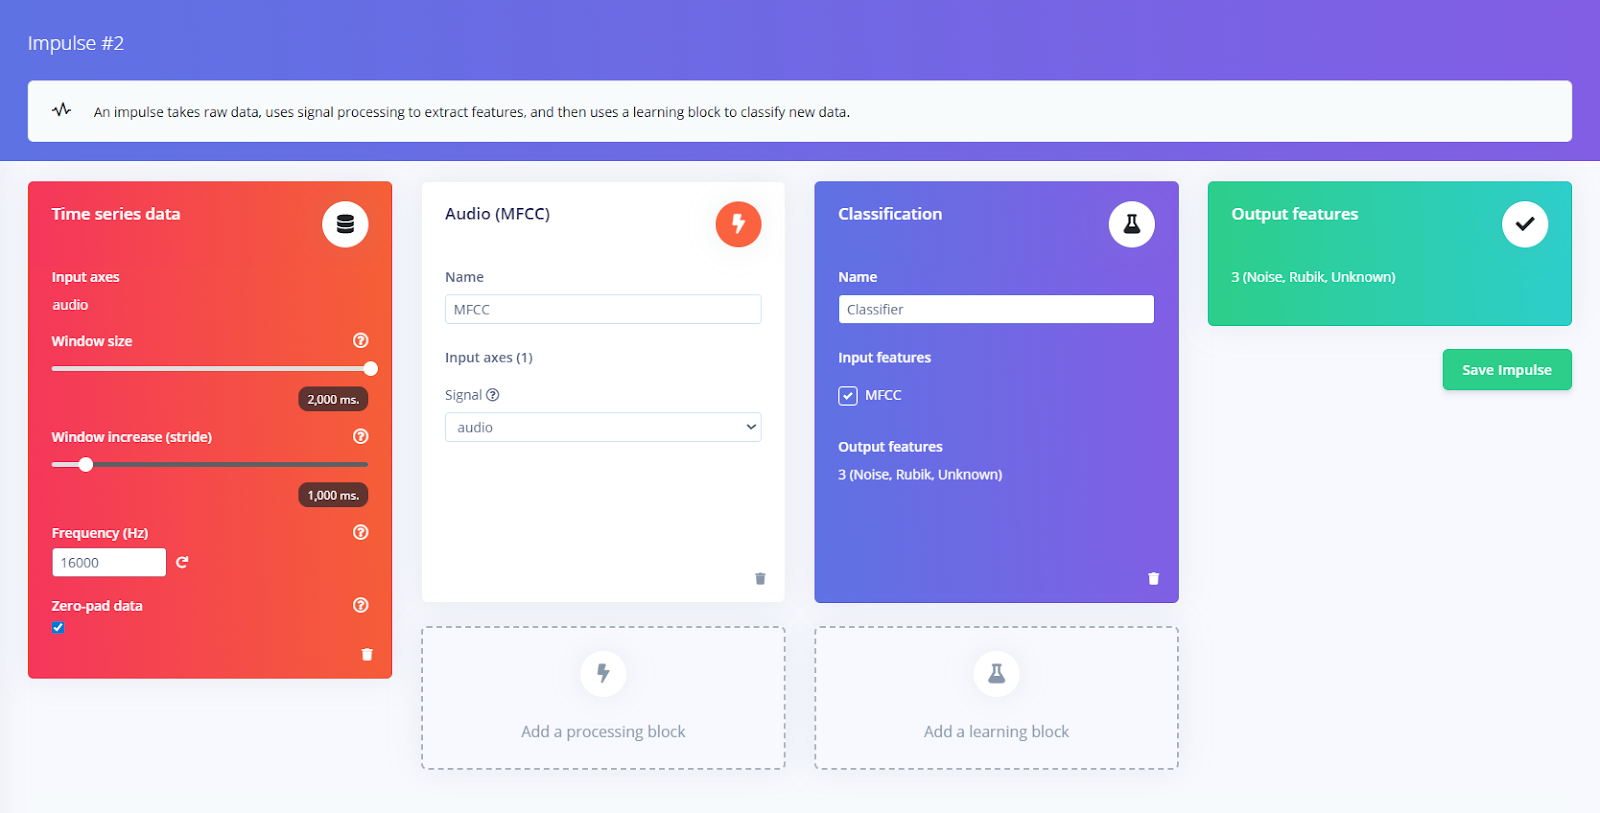
- Processing block: Go to Create Impulse → Processing blocks, and add Audio (MFCC).
This block computes Mel-frequency Cepstral Coefficients from each audio window. MFCC is the standard for human speech. Edge Impulse also has MFE, which gives a mel-scaled spectrogram; this can sometimes improve non-speech tasks.
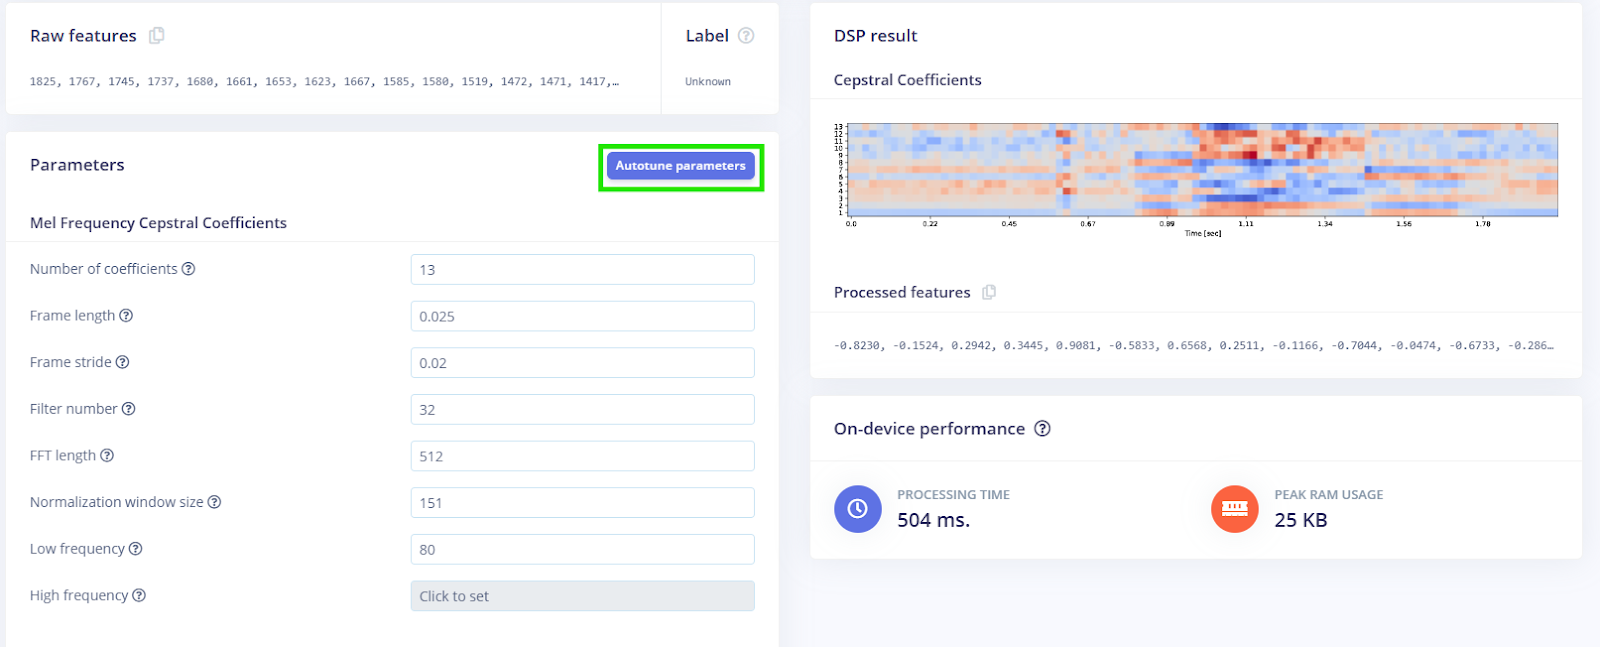
The MFCC block will output a matrix (frames × coefficients) for each 2s clip. By default, it uses ~30 ms frames with ~10 ms overlap – good starting values.
- Parameters: In the MFCC block settings, you might leave defaults or adjust: e.g., number of coefficients (12–13 is common), lower/higher frequencies (default covers human speech). Edge Impulse can autotune parameters, but manual tuning works too. Optionally enable Pre-emphasis (a high-pass filter) to equalize the spectrum.
- Windowing: Make sure the frame length plus overlap yields low latency. For real-time wake detection, small windows (20–30 ms) and small hops (frame-stride) ensure the model sees audio frequently.
In our case, we utilized the autotune feature, which automatically searches for the optimal parameters based on the data.
- Learning block: After MFCC, add a Classification block.
Edge Impulse will suggest a neural network architecture. For audio, a 1D-CNN on the MFCC frames or even a dense NN can work. We’ll start with the default model replaced with 2D-convolutions.
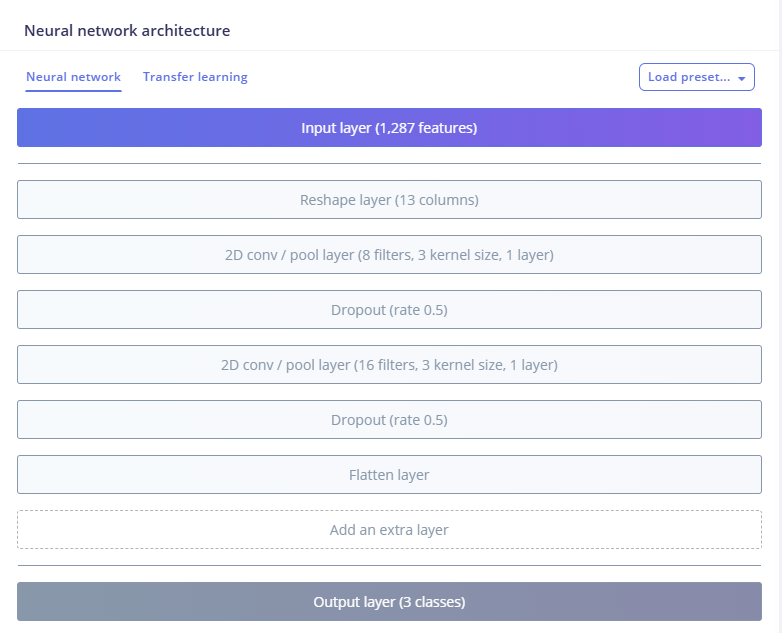
Together, this impulse (MFCC + NN) will extract voice features optimized for our data.
Feature engineering for voice recognition
Before training, inspect your features:
- Visualize: In Edge Impulse’s Feature Explorer, plot the spectrogram or MFCC heatmap for the sample data. Adjust the MFCC parameters if “Hey Rubik” patterns look too faint.
- Parameter tuning: Increase the number of MFCC coefficients if needed (to capture more detail) or widen the filterbank range. For a single-word wake, 13 coefficients are often enough.
The goal is to have features that cleanly separate “Hey Rubik” from others. Good pre-processing ensures the network sees consistent input.
Neural network training and optimization
With the Impulse designed, click Train Model.
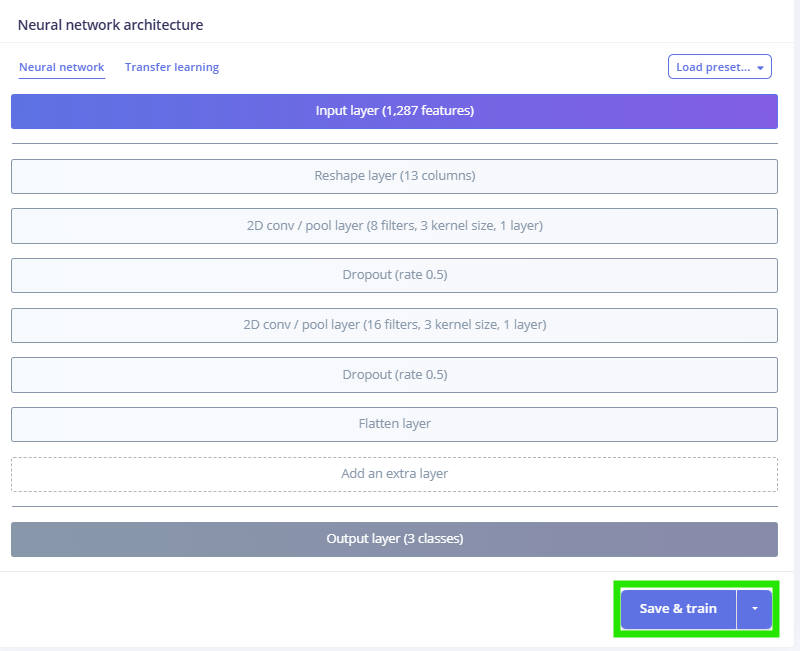
Edge Impulse will train the network and show metrics. Key steps:
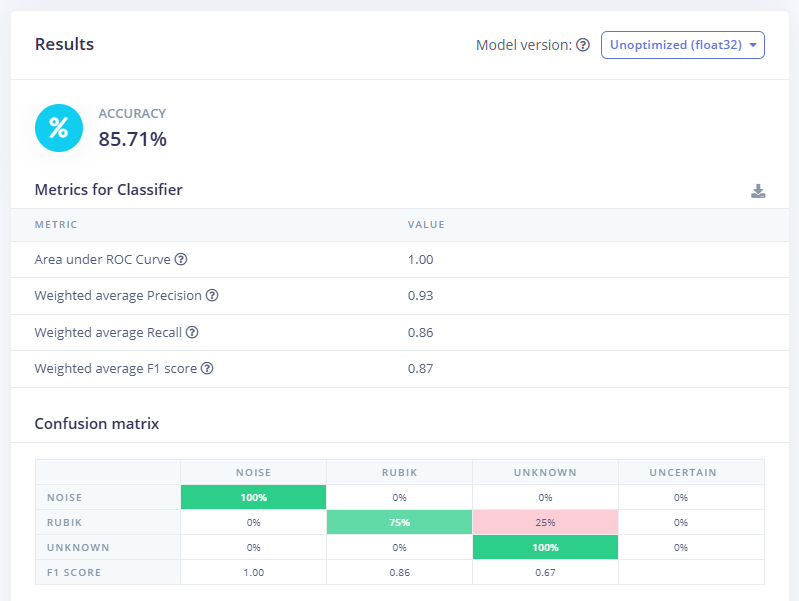
- Monitor accuracy: Watch the training and validation accuracy. The confusion matrix will indicate whether “Rubik Pi” is often misclassified as “unknown” or “noise”. If one class lags, collect more data or tune the network.
- Network choices: A 1D-CNN or a few fully-connected layers usually suffice for keyword spotting. You could try both 1D (time-domain) and 2D (time-frequency) approaches.
- Data Augmentation: Increase robustness by enabling augmentation settings. Besides time shifts, you can overlay background noise or vary pitch.
- Early checks: Ensure the dataset is balanced: if you have much more “noise” than “Hey Rubik,” the model might be biased toward noise. Use the Rebalance tool or collect more small-class samples.
As you train, iterate: adjust layers or add more epochs if underfitting. If the model stalls, try changing the learning rate or architecture depth. Edge Impulse’s Retrain model lets you quickly experiment. The confusion matrix can indicate problems (e.g., if “Hey Rubik” is often seen as “unknown,” you may need clearer positive examples). In our case, with the settings we chose, here are the results:

Model testing and validation
After training, rigorously test the model:
- Live Classification: In Edge Impulse Studio, use the Live classification panel. Here, your Rubik Pi 3 streams real audio. Click Start sampling and speak. The tool will classify each window and display probabilities per class. Verify that saying “Hey Rubik” yields a high score for the Rubik class, and that silence or other words give low Rubik scores. This immediate feedback is helpful for quick sanity checks.
- Model Testing: For systematic evaluation, use the Model Testing tab. Edge Impulse automatically puts any captured live samples into the Test set. Select a test clip, set its true label (e.g., noise) or select all, and run Classify all. The Studio then computes overall accuracy on the entire test set.
- Multi-speaker/noise tests: Have different people say the wake word, try in noisy locations, and measure consistency. Note the latency: the model processes audio in windows, so “Hey Rubik” may only be recognized after ~100–200 ms from the end of the word.
By combining live listening and test-set metrics, we ensure the wake-word detector is reliable across conditions. Regularly repeat testing if you tweak the model, to guard against unintentional overfitting.
Model deployment and integration
Once satisfied, it’s time to run on the device:
- Download the model: In Edge Impulse Studio, go to Deployment, choose Linux (ARM64 with Qualcomm QNN), and click Build. This generates an .eim file (Edge Impulse Model).
Edge Impulse CLI: On the Rubik Pi 3 (with the Runner installed), open a terminal. Simply run:
- This command will automatically pull the latest model from your project and start classification using hardware acceleration by asking to select an impulse and the model optimization. The console will show live predictions as follows:
In the terminal response above, we have boxed where we said the wake word.
Manual .eim: Alternatively, copy the .eim file to the Rubik Pi via scp or USB. Then run:
- This directly loads the model (quantized if possible for the NPU) and begins inference.
- Testing on-device: With the model running, speak "Hey Rubik" near the microphone. You should see an output message or indicator that the
Rubikclass was detected with a high confidence score.
This completes the end-to-end pipeline. The Rubik Pi 3’s hardware NPU (12 TOPS) ensures that even a moderate CNN runs quickly, making real-time recognition smooth.
Testing & validation (optional)
In final testing, treat the system as a black box:
- User trials: Have team members or users interact with the device naturally. Do they need to pause after “Hey Rubik” or can they say it fluidly? Does the system sometimes classify incorrecty (a false positive) or miss it when spoken softly?
- Acoustic conditions: Test in different rooms (quiet vs. noisy), with and without ambient music/TV. Check if raising the confidence threshold (or requiring the second-highest class to be sufficiently low) helps reduce “unintended” classifications.
- Response time: Measure end-to-end latency. The EI runner typically processes frames in a few milliseconds, so latency is mostly the length of the audio window (e.g., 0.1–0.2 s) plus processing. The 12 TOPS NPU means this is negligible.
- Robustness: If the model confuses certain words with “Hey Rubik,” add those words to the unknown class and retrain. Likewise, if background noises erroneously trigger it, increase noise diversity or set a higher detection threshold.
Finally, implement a confidence threshold in your application code. For example, ignore “Hey Rubik” detections unless the model confidence is ≥0.7. This avoids acting on low-confidence guesses.
A consistent user experience means reliable recognition for all accents and minimal false wakes.
Conclusion and next steps
In this guide, we built a basic on-device voice keyword spotter on the Rubik Pi 3. Key steps included understanding the audio signal (sampling, spectrograms), designing a distinct wake word, collecting a diverse dataset, and using Edge Impulse to extract MFCC features and train a neural network. We then deployed the model using Edge Impulse Runner on the Rubik Pi 3, achieving real-time voice detection via the Rubik Pi 3's hardware AI accelerator.
The Rubik Pi 3’s 12 TOPS AI engine means it can handle this task with room to spare. Your exact accuracy will depend on data quality, but with a few hundred diverse samples, we typically saw over 90% correct detection in quiet conditions.
Finally, once the wake word is caught, you could feed subsequent audio to an onboard speech-to-text engine or simple command parser for full voice control.
Get started today and see how easily you can integrate voice control into your projects!