
The past years have brought us three really interesting things: 1) TensorFlow Lite, portable runtime for neural networks aimed at running machine learning models on mobile devices. 2) Emscripten, a toolchain that can compile C and C++ applications into WebAssembly, making these applications available from any browser. 3) Access to many sensors straight from your mobile web browser. All these features are cool on their own, but together they enable something truly magical: classifying what happens in the real world straight from the browser. Let’s put that in practice!
With six people in our household and just a single shower, there was a constant morning struggle over shower usage while growing up. This eventually led to my parents placing an analog timer next to the shower which you were supposed to set to a 5-minute limit, but naturally, this was prone to cheating (just set it a minute after you started showering). With the lockdown in place, I figured this was a good moment to see if we can rebuild this with some more technology: a shower timer that detects when a shower is turned on or off in real-time using a small neural network running in the browser.
Here’s a video of the final result:
Collecting data, extracting features, and training a neural network
Everything in machine learning starts with data, and the very first step of building a machine learning model should be to determine what data you actually need. For this model we know we want to obtain raw audio data of typical bathroom activities (brushing teeth, sink on/off, walking around, opening/closing the shower door), captured both with and without the shower on. That way the ’shower on/off’ is the only discriminating action that the model will learn.
Dan Situnayake already wrote an excellent tutorial on capturing this data (can be done from the same mobile phone), using MFCC to extract features, and then training a small neural network to classify different states, so I suggest you follow that to build the initial model. I ended up collecting ~21 minutes of data, evenly split between noise (shower off) and shower (shower on). All data is hosted on GitHub, but is very specific to my bathroom. You probably want to build your own dataset. Here are some examples:
Toothbrush (shower off)
Shower on
After capturing this data and then letting this train for a few minutes using Dan’s tutorial this gave an accuracy on the validation set of 95.3%. My feeling is that we are overfitting a bit, but good enough for now. On to the next phase!
From model to WebAssembly
The machine learning model that I trained consists of two steps: 1) preprocessing of the data, by extracting a spectrogram from the raw audio waveform using MFCC, 2) running the spectrogram through a neural network to get a classification using TensorFlow. To run this model in the browser we thus need to convert both these steps into something the browser understands.
One way would be to reimplement the MFCC algorithm in JavaScript, convert the neural network using TensorFlow.js, and wire this up. But that actually takes effort and is prone to bugs. But there is another way. As we (at Edge Impulse) already run these algorithms on very constraint microcontrollers - typically an 80MHz Cortex-M4F with 128K RAM - we have an optimized embedded C++ SDK that contains implementations of both the MFCC algorithm, Tensorflow Lite, and binding code to run both the preprocessing step and the classifier.
Paired with Emscripten - which can cross-compile C++ codebases to WebAssembly - we can thus convert our existing codebase to something that runs in the browser, without having to reimplement anything.
You can get a C++ library which contains both the MFCC code, the TensorFlow Lite runtime, and the TensorFlow Lite model from the Deployment tab in Edge Impulse, or if you’re not using Edge Impulse you can build this by hand using edgeimpulse/inferencing-sdk-cpp and converting your TensorFlow SavedModel using tflite_convert.
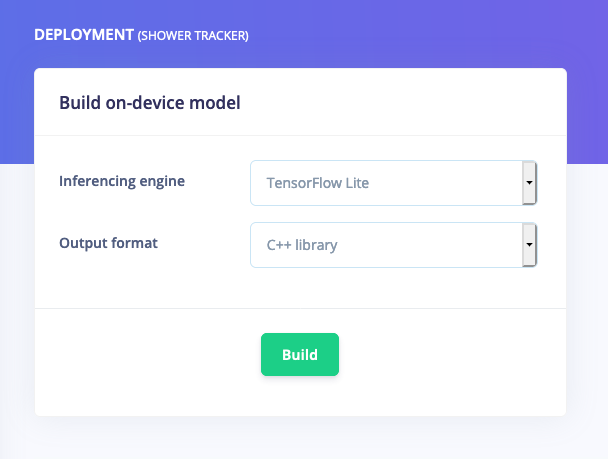
Grabbing the C++ library containing all building blocks and the neural network from Edge Impulse
After extracting this library we need to write some binding code, which specifies how JavaScript code can interact with this library. Add a new file in the folder named emcc_binding.cpp:
emcc_binding.cpp
#include <emscripten/bind.h>
#include "ei_run_classifier.h"
using namespace emscripten;
// Structures that will be returned with classification information
// Emscripten can automatically bind types like std::string and std::vector to JavaScript types
// so use those over raw pointers.
typedef struct {
std::string label;
float value;
} emcc_classification_result_category_t;
typedef struct {
int result;
std::vector<emcc_classification_result_category_t> classification;
float anomaly;
} emcc_classification_result_t;
typedef struct {
int sensor;
float frequency;
uint32_t frame_sample_count;
} emcc_classification_properties_t;
// Main function, this calls the classifier with a raw buffer (which is cast to a pointer in the function)
emcc_classification_result_t emcc_run_classifier(size_t input_buffer_raw, size_t input_buffer_size, bool debug) {
float input_buffer = (float)input_buffer_raw;
ei_impulse_result_t impulse_result;
signal_t signal;
numpy::signal_from_buffer(input_buffer, input_buffer_size, &signal);
EI_IMPULSE_ERROR res = run_classifier(&signal, &impulse_result, debug);
emcc_classification_result_t ret;
ret.result = (int)res;
for (size_t ix = 0; ix < EI_CLASSIFIER_LABEL_COUNT; ix++) {
emcc_classification_result_category_t r;
r.label = std::string(impulse_result.classification[ix].label);
r.value = impulse_result.classification[ix].value;
ret.classification.push_back(r);
}
ret.anomaly = impulse_result.anomaly;
return ret;
}
// Some information about the capabilities of this model (e.g. which sensor was used)
emcc_classification_properties_t emcc_get_properties() {
emcc_classification_properties_t properties = { 0 };
properties.sensor = EI_CLASSIFIER_SENSOR;
properties.frequency = EI_CLASSIFIER_FREQUENCY;
properties.frame_sample_count = EI_CLASSIFIER_RAW_SAMPLE_COUNT;
return properties;
}
// Expose the types and the functions
EMSCRIPTEN_BINDINGS(my_module) {
class_<emcc_classification_result_category_t>("emcc_classification_result_category_t")
.constructor<>()
.property("label", &emcc_classification_result_category_t::label)
.property("value", &emcc_classification_result_category_t::value);
class_<emcc_classification_result_t>("emcc_classification_result_t")
.constructor<>()
.property("result", &emcc_classification_result_t::result)
.property("classification", &emcc_classification_result_t::classification)
.property("anomaly", &emcc_classification_result_t::anomaly)
;
class_<emcc_classification_properties_t>("emcc_classification_properties_t")
.constructor<>()
.property("sensor", &emcc_classification_properties_t::sensor)
.property("frequency", &emcc_classification_properties_t::frequency)
.property("frame_sample_count", &emcc_classification_properties_t::frame_sample_count)
;
function("run_classifier", &emcc_run_classifier, allow_raw_pointers());
function("get_properties", &emcc_get_properties, allow_raw_pointers());
register_vector<emcc_classification_result_category_t>("vector<emcc_classification_result_category_t>");
Next, we can compile all of this into a WebAssembly library. First, install Emscripten, make sure emcc is in your PATH, then open a terminal or command prompt and run:
$ mkdir -p build
$ emcc -c -DTF_LITE_DISABLE_X86_NEON -I. -Isource -Iedge-impulse-sdk/ -Iedge-impulse-sdk/tensorflow -Iedge-impulse-sdk/third_party -Iedge-impulse-sdk/third_party/flatbuffers -Iedge-impulse-sdk/third_party/flatbuffers/include -Iedge-impulse-sdk/third_party/flatbuffers/include/flatbuffers -Iedge-impulse-sdk/third_party/gemmlowp/ -Iedge-impulse-sdk/third_party/gemmlowp/fixedpoint -Iedge-impulse-sdk/third_party/gemmlowp/internal -Iedge-impulse-sdk/third_party/ruy -Imodel-parameters -Itflite-model -Iedge-impulse-sdk/anomaly -Iedge-impulse-sdk/classifier -Iedge-impulse-sdk/dsp -Iedge-impulse-sdk/dsp/kissfft -Iedge-impulse-sdk/porting -O3  edge-impulse-sdk/tensorflow/lite/c/common.c -o build/common.o
$ emcc -DTF_LITE_DISABLE_X86_NEON -std=c++11 -I. -Isource -Iedge-impulse-sdk/ -Iedge-impulse-sdk/tensorflow -Iedge-impulse-sdk/third_party -Iedge-impulse-sdk/third_party/flatbuffers -Iedge-impulse-sdk/third_party/flatbuffers/include -Iedge-impulse-sdk/third_party/flatbuffers/include/flatbuffers -Iedge-impulse-sdk/third_party/gemmlowp/ -Iedge-impulse-sdk/third_party/gemmlowp/fixedpoint -Iedge-impulse-sdk/third_party/gemmlowp/internal -Iedge-impulse-sdk/third_party/ruy -Imodel-parameters -Itflite-model -Iedge-impulse-sdk/anomaly -Iedge-impulse-sdk/classifier -Iedge-impulse-sdk/dsp -Iedge-impulse-sdk/dsp/kissfft -Iedge-impulse-sdk/porting -O3  -s WASM=1 --bind emcc_binding.cpp edge-impulse-sdk/dsp/kissfft/.cpp edge-impulse-sdk/dsp/dct/.cpp edge-impulse-sdk/tensorflow/lite/kernels/.cc edge-impulse-sdk/tensorflow/lite/kernels/internal/.cc edge-impulse-sdk/tensorflow/lite/micro/kernels/.cc edge-impulse-sdk/tensorflow/lite/micro/.cc edge-impulse-sdk/tensorflow/lite/micro/memory_planner/.cc edge-impulse-sdk/tensorflow/lite/core/api/.cc edge-impulse-sdk/porting/posix/.c build/common.o -o build/edge-impulse-standalone.js
This creates two files in your build directory: a .wasm file, and a .js file. To test the library, use the Node.js application linked here: Running your impulse locally (WebAssembly).
$ node run-impulse.js
{
anomaly: 0,
results: [
{ label: ’noise’, value: 0.8984375 },
{ label: ’shower’, value: 0.1015625 }
]
}
Classifying live data
With the model available as a WebAssembly library we can tie it to the WebAudio APIs in the browser, and then live classify what is happening. For a robust model you don’t want to rely on a single classification, so rather my approach here is (source code):
- Every second we use a sliding window over the last 5 seconds of data, with an increase of 250 ms. This gives 17 windows. Classify each of these.
- To classify this 5 second window:
- If 80% of the windows is classified as ’shower’ => shower is on.
- If 60% of the windows is classified as ’noise’ => shower is off.
- Else, state is uncertain.
- These results are stored (so you have a new one every second, containing a classification over the last 5 seconds), and depending on the last 5 results:
- If 3/5 are classified as ’shower’ => show in the UI that the shower is on.
- If 3/5 are classified as ’noise’ => show in the UI that the shower is off.
- Else, don’t change the UI.
This adds a bit of delay as it might take 10 seconds to determine that the shower was turned on or off, but is very resilient and a lot more accurate than looking at single windows. In my tests we were max. ~5 seconds off from the actual shower time.
To bind the microphone to the classified I used Recoder.js is a great project which gives a (relative) easy to use API for this, but there are some caveats:
- The neural network expects audio in PCM16 format. I’ve patched Recorder.js to output data in this format and added a wrapper here to make this easier.
- The audio API is well guarded by most browsers. It’s only accessible from https origins, and requires a user interaction (e.g. button click) to even prompt the permission dialog. You can use ngrok to expose your local computer over HTTPS to your phone.
The whole application is available on Github: demo-shower-monitor.
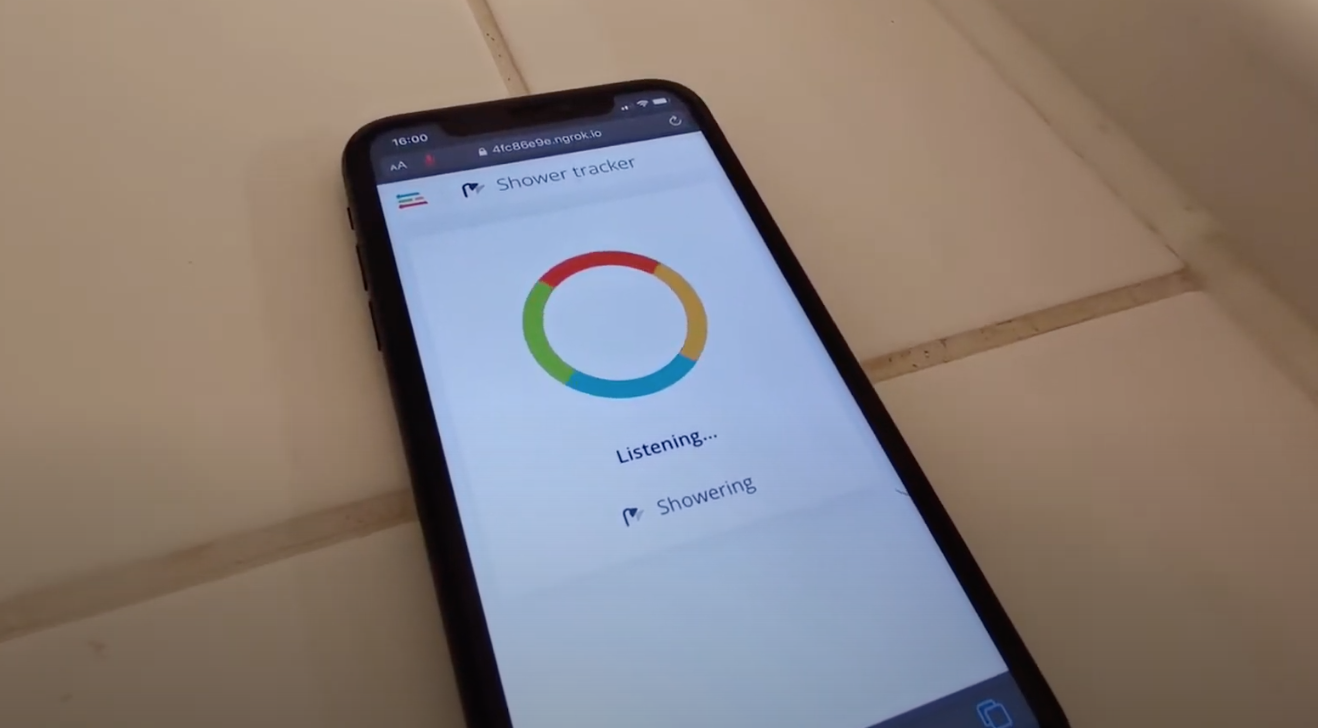
Web application running on phone, listening on the microphone, and detecting that the shower was turned on.
Recap
In my mind machine learning and sensors make perfect sense. Sensor data is messy and hard to interpret and machine learning can quickly uncover hidden correlations in this data, allowing you to detect very complex events in realtime. Thanks to the amazing efforts by both Google’s TensorFlow team, in making a small and portable neural network runtime, and by Alon Zakai and the rest of the Emscripten team on making C++ code run really fast in the browser, we can now run these detection models on commodity phones without having to install anything. Truly amazing.
Another thing that this enables is that we can show the whole TinyML flow - collecting data, training a machine learning model, and deploying it back to a device - on any mobile phone, with no external dependencies. For anyone who has ever tried to do a workshop involving hardware, this is a godsend. And any model you build with your phone can still be deployed on small microcontrollers. Here’s a video of the entire flow.
If this got you excited and want to build your own models, sign up for an Edge Impulse account, head to the ’Devices’ page, and connect your phone. We can even run these models on small microcontrollers. We can’t wait to see what you build!
???? ????
--
Jan Jongboom is the CTO and co-founder of Edge Impulse. He’s been looking at the boundaries of technology and the real-world for quite a while now. Here are some earlier experiments on abusing phones to detect interesting things: https://www.youtube.com/watch?v=Uy062kp-LM4.