
During The Things Conference this January I talked about the combination of LoRaWAN and on-device machine learning (TinyML). This is an incredibly powerful combination, as to preserve power and bandwidth LoRaWAN devices often resort to sending very little data. A device for monitoring machine health by observing the machine’s vibration pattern might just send the peak motion every hour, discarding interesting potential fault states. With machine learning, you can analyze the full signal on the device itself and just send the conclusion (’abnormal vibration pattern seen’) to the network.
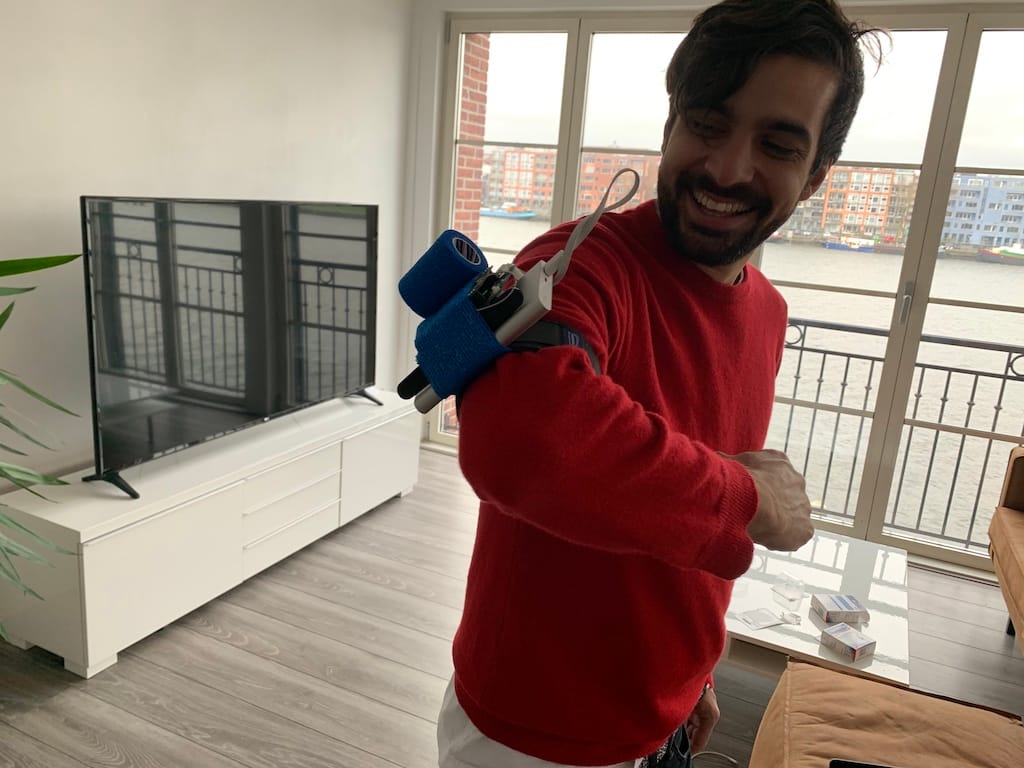
To demonstrate the power of this combination during The Things Conference we managed to get Johan Stokking (the co-founder of The Things Network) on-stage wearing a sheep costume and a LoRaWAN-based activity tracker. The arm-mounted tracker runs a small machine learning model that classifies five different activities (standing, walking, jumping jacks, push-ups, drinking beer) in real-time, and constantly monitors for new activities. If a change is detected it sends a small packet over LoRaWAN.
Sheep classification during The Things Conference
And the best part? You can actually build the same demo. In this post, we’ll go over the hardware and steps required to build your first machine learning-powered LoRaWAN device.
1. Requirements
To replicate the demo you’ll need to get the following hardware:
- ST IoT Discover Kit - a development board with an 80 MHz Cortex-M4 processor and 128K RAM, that also has an accelerometer (used in this demo) and a microphone (useful for lots of other applications). (*)
- LoRa radio shield (tested with the SX126xMB2xAS and SX1276MB1xAS shields) - to send the results back to The Things Network.
- A USB battery pack to power the device.
- A way to strap the development board to your arm - it’s important that the board uses the same location and orientation at all times. We used a sleeve brace with velcro.
You also need:
- A nearby LoRaWAN gateway connected to The Things Network - to relay data back from the device.
- An account with The Things Network - to retrieve your inferencing results.
- An account with Edge Impulse - to train the machine learning model.
(*) Naturally, you can replicate the same build with your favorite development board, but you’ll need to be able to get raw sensor data off the device. There’s more information on this in the next sections.
2. Collecting data
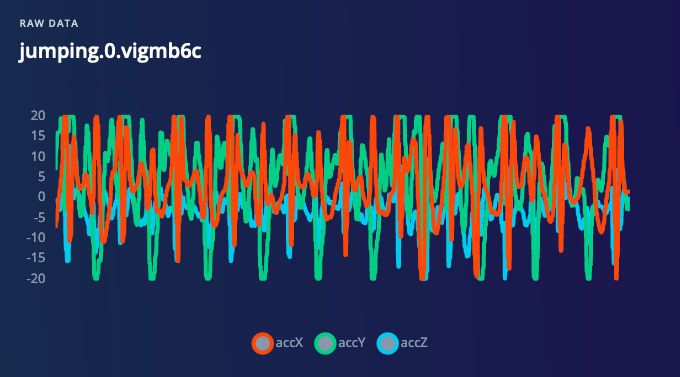
To build a machine learning model you need to collect data, and preferably lots of data in many different variations. For the demo during The Things Conference we collected 14 minutes of data evenly spread over the five movements. It’s also important that you add variety in how you perform the movements, or use multiple people to generate the data, to ensure that the model works reliably in the real world. To collect the data:
- Set up your development board - to connect the development board to Edge Impulse. Ensure that you connect the development board over WiFi.
- Strap the device to your arm.
- From ’Data acquisition’ in Edge Impulse select the movement that you’re going to do, and click Start sampling.
- Start doing the movement - yes, you need to do real push-ups!
During the data collection phase, you need access to raw data - and because of bandwidth limitations, it’s not practical to offload this data over LoRaWAN. The IoT Discovery Kit, fortunately, has a WiFi radio which you can use to retrieve the raw data. If you have a different development board and you have access to the raw sensor data (for example, using an SD card) you can send your data to the ingestion service and the data is automatically added to your project.

3. Generating a machine learning model
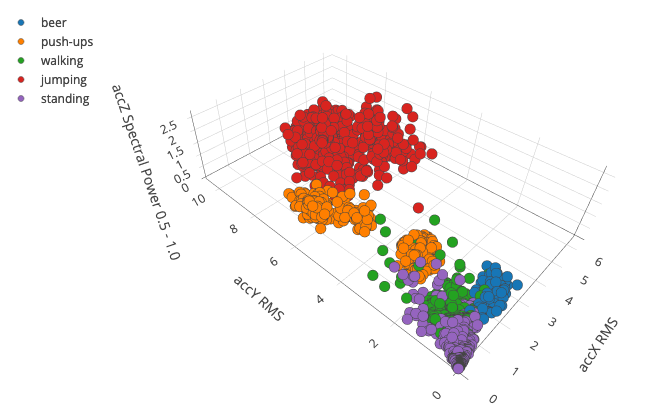
With the raw data in place, you can let the computer learn to distinguish between the five movements. This is a three stage process:
- Extract meaningful features from the raw data. This is done to reduce the noise in the signal, and to reduce the amount of data you need to process in the machine learning model (here’s some background on why this is important).
- Train a neural network that can distinguish between the five classes. Neural networks will find hidden correlations between the features, thus telling us what movement was performed.
- Train an anomaly detection model, to detect when something is amiss. Neural networks are great, but can only classify what they know. If a completely new movement is performed you’d like to know that, instead of misclassifying.
To train the model, follow steps 3 and 4 in this tutorial. In there, you design and test the model against real-world data.
4. Deploying back to the device
If you’re happy with the model - this might take several iterations to ensure you capture every variation - you can then deploy the model back to the device. Afterward you no longer need a WiFi connection, the model will run in realtime on the development board, and only when you change between movements the device sends a message over LoRaWAN. To do this:
Ensure you can build mbed-os-example-lorawan for the development board and that you can connect to The Things Network.
- This should be straight forward. Make sure you use the right config (SX126x or SX127x depending on your radio shield), and in the config replace
K64FwithDISCO_L475VG_IOT01A.
Update the stack size of the main thread. Open the config file from 1, and update main_stack_size to read 8192.
Add the BSP_B-L475E-IOT01A library to the project. This includes the accelerometer driver for the board.
You can do this via:
$ mbed add https://developer.mbed.org/teams/ST/code/BSP_B-L475E-IOT01/#9dfa42666f03
Export your project from Edge Impulse as a C++ library. This packages up all the signal processing code, neural network and anomaly detection which you can compile into your application. To do so:
- In Edge Impulse go to Deployment.
- Under ’Inferencing engine’, select TensorFlow Lite.
- Under ’Output format’, select C++ libary.
- Click Build.
- Extract the ZIP file and place the three folders in the
mbed-os-example-lorawanproject.
In main.cpp add the following includes:
#include "stm32l475e_iot01_accelero.h"
#include "ei_run_classifier.h"
using namespace ei;
Replace the send_message function with:
#define TX_INTERVAL 3000
#define MINIMUM_CONFIDENCE 0.7
static void send_message() {
// our window size is 2 seconds, but we don’t want to rely on a single window (lots of false positives / negatives)
// so we capture 4 seconds of data, then slide over this 4 seconds in 2 second windows
// and if 70% of the windows are classified the same we send a message
// 0. allocate a buffer that can hold the 4s data
static float accel_data[EI_CLASSIFIER_DSP_INPUT_FRAME_SIZE * 2] = { 0 };
static uint8_t last_top_result = 99;
static bool first_send_message = true;
// instantiate the sensor if it’s the first message
if (first_send_message) {
int accel_init = BSP_ACCELERO_Init();
if (accel_init != ACCELERO_OK) {
printf("Failed to initialize accelerometer\n");
return;
}
first_send_message = false;
}
// 1. capture raw data into the buffer
Timer timer;
timer.start();
printf("Sampling data for 4 seconds...\n");
size_t accel_data_ix = 0;
while (1) {
int64_t next_tick = timer.read_us() + static_cast<int64_t>(EI_CLASSIFIER_INTERVAL_MS * 1000);
int16_t accel_data_i16[3] = { 0 };
BSP_ACCELERO_AccGetXYZ(accel_data_i16);
accel_data[accel_data_ix++] = static_cast<float>(accel_data_i16[0]) / 100.0f;
accel_data[accel_data_ix++] = static_cast<float>(accel_data_i16[1]) / 100.0f;
accel_data[accel_data_ix++] = static_cast<float>(accel_data_i16[2]) / 100.0f;
// end of the buffer
if (accel_data_ix == EI_CLASSIFIER_DSP_INPUT_FRAME_SIZE * 2) {
break;
}
// let’s sleep for (wait_time / 1000) - 1 ms. then busy loop from there
uint64_t wait_time = next_tick - timer.read_us();
// sleep OK (/1000 already floors it)
ThisThread::sleep_for((wait_time / 1000) - 1);
// busy loop til next tick
while (next_tick > timer.read_us());
}
printf("Sampling data OK\n");
// 2. slide over the 4 seconds of data, and store the output per window in the count variable
uint8_t count[EI_CLASSIFIER_LABEL_COUNT + 2] = { 0 };
for (size_t ax = 0; ax < EI_CLASSIFIER_DSP_INPUT_FRAME_SIZE; ax += EI_CLASSIFIER_RAW_SAMPLES_PER_FRAME * 6) {
signal_t features_signal;
int r = numpy::signal_from_buffer(accel_data + ax, EI_CLASSIFIER_DSP_INPUT_FRAME_SIZE, &features_signal);
if (r != 0) {
printf("Failed to convert buffer into signal (%d)\n", r);
ev_queue.call_in(TX_INTERVAL, send_message);
return;
}
ei_impulse_result_t result;
// invoke the impulse
EI_IMPULSE_ERROR res = run_classifier(&features_signal, &result, false);
if (res != 0) {
printf("Failed to run neural network (%d)\n", res);
ev_queue.call_in(TX_INTERVAL, send_message);
return;
}
bool conclusion = false;
// print the predictions per window (useful for debugging)
printf("[");
#if EI_CLASSIFIER_HAS_ANOMALY == 1
printf("%.3f, ", result.anomaly);
if (result.anomaly >= 0.5) {
count[EI_CLASSIFIER_LABEL_COUNT]++;
conclusion = true;
}
#endif
for (size_t ix = 0; ix < EI_CLASSIFIER_LABEL_COUNT; ix++) {
if (result.classification[ix].value >= MINIMUM_CONFIDENCE && !conclusion) {
count[ix]++;
conclusion = true;
}
printf("%.5f", result.classification[ix].value);
if (ix != EI_CLASSIFIER_LABEL_COUNT - 1) {
printf(", ");
}
}
printf("]\n");
if (!conclusion) {
count[EI_CLASSIFIER_LABEL_COUNT + 1]++;
}
}
// 3. make sure we meet the minimum probability threshold (70%)
uint8_t result_count = EI_CLASSIFIER_DSP_INPUT_FRAME_SIZE / (EI_CLASSIFIER_RAW_SAMPLES_PER_FRAME * 6) + 1;
uint8_t confidence_threshold = MINIMUM_CONFIDENCE * result_count;
uint8_t top_result = 0;
uint8_t top_count = 0;
bool met_confidence_threshold = false;
for (size_t ix = 0; ix < EI_CLASSIFIER_LABEL_COUNT + 2; ix++) {
if (count[ix] > top_count) {
top_result = ix;
top_count = count[ix];
}
if (count[ix] > confidence_threshold) {
met_confidence_threshold = true;
}
if (ix < EI_CLASSIFIER_LABEL_COUNT) {
printf("%s: ", ei_classifier_inferencing_categories[ix]);
}
else if (ix == EI_CLASSIFIER_LABEL_COUNT) {
printf("anomaly: ");
}
else if (ix == EI_CLASSIFIER_LABEL_COUNT + 1) {
printf("uncertain: ");
}
printf("%d", count[ix]);
if (ix != EI_CLASSIFIER_LABEL_COUNT + 1) {
printf(", ");
}
}
printf("\n");
if (!met_confidence_threshold) {
printf("Result didn’t meet confidence threshold, doing nothing\r\n");
ev_queue.call_in(1, send_message);
return;
}
if (top_result == last_top_result) {
printf("Result was unchanged, doing nothing\r\n");
ev_queue.call_in(1, send_message);
return;
}
last_top_result = top_result;
// 4. changed! Send out a message over LoRaWAN back to TTN
int retcode = lorawan.send(15, count, EI_CLASSIFIER_LABEL_COUNT + 2, MSG_UNCONFIRMED_FLAG);
if (retcode < 0) {
retcode == LORAWAN_STATUS_WOULD_BLOCK ? printf("send - Duty cycle violation\r\n")
: printf("send() - Error code %d \r\n", retcode);
if (retcode == LORAWAN_STATUS_WOULD_BLOCK) {
//retry in 3 seconds
ev_queue.call_in(3000, send_message);
}
return;
}
Build and flash the application.
The above code sample takes four seconds of sample data, then moves over this in two second windows (sliding window), classifies each window, and if 70% of the windows are classified the same and if the movement was different, it sends a message to The Things Network. You can then show the data either in the The Things Network console, or use a custom application to display the output.
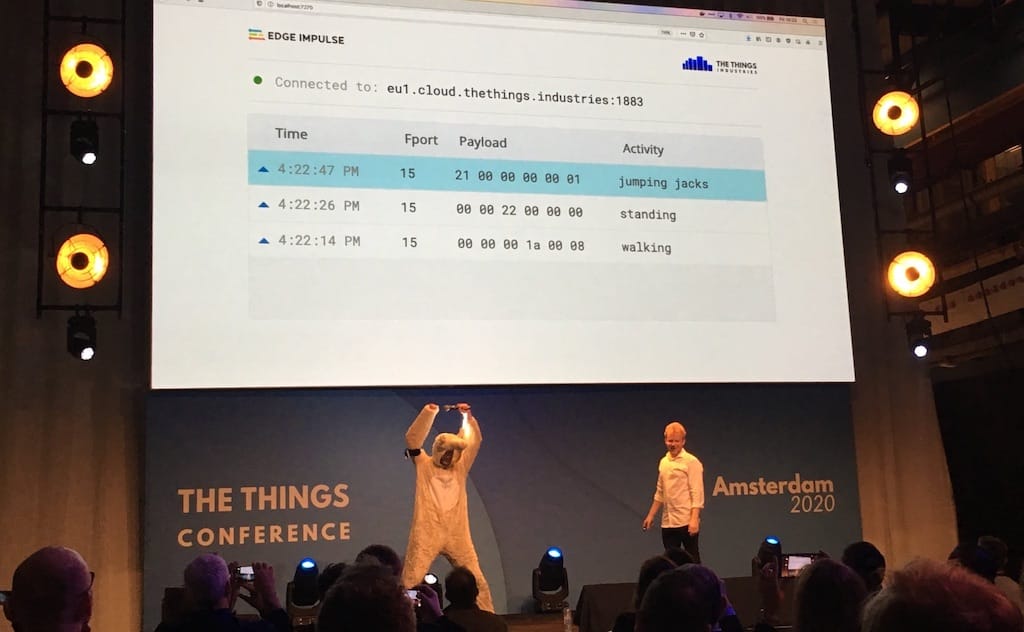
Live classifying sheep movements. Data goes from the device over LoRaWAN, through The Things Network, to a custom dashboard.
Want more?
Building this demo (and convincing Johan to wear a sheep costume) was tremendous fun, and I believe that LoRaWAN and machine learning together will lead to more powerful and sophisticated devices, without sacrificing battery life. Some other ideas that I see are using accelerometers to detect whether a package is on a boat or a car (for asset tracking), detecting abnormal temperature patterns (for cold-chain monitoring) or using a microphone to hear glass breaking (for building monitoring).
If you have a great idea that you want to work on, let us know. We can’t wait to see what you’ll build!
Jan Jongboom is the CTO and co-founder of Edge Impulse. He has been frustrated by sophisticated sensors that are underutilized since 2015.