
In today’s tech world, CI/CD (Continuous Integration/Continuous Deployment) is one of the critical factors for delivering fully tested and up-to-date software or firmware to your customers.
To make this process easier for our users using GitHub workflows, we prepared a key element: GitHub Action for the easy build and deployment of your Edge Impulse model into your workflow.
Edge Impulse Build & Deploy Action
As some users know, Edge Impulse provides a comprehensive REST API for seamless integration with any third-party services. This API also allows for building custom scripts and services that automate working with Studio. It is especially useful if you would like to automatically retrain your model on new data, keep the model accurate, and automatically generate new firmware for your product containing the latest and more accurate model.
Our Action enables you to make the latter in a much easier way. The only requirement is to use GitHub to store your firmware source code. Using our Action is much easier than implementing the whole process by yourself, especially as we are actively maintaining the Action and ensuring it is running without any issues.
How to use it?
To use our Action, simply add the following code to your workflow YAML file:
- name: Build and deploy Edge Impulse Model
     uses: edgeimpulse/build-deploy@v1
     id: build-deploy
     with:
       project_id: ${{ secrets.PROJECT_ID }}
       api_key: ${{ secrets.API_KEY }}
As you can see, this Action requires at least two parameters:
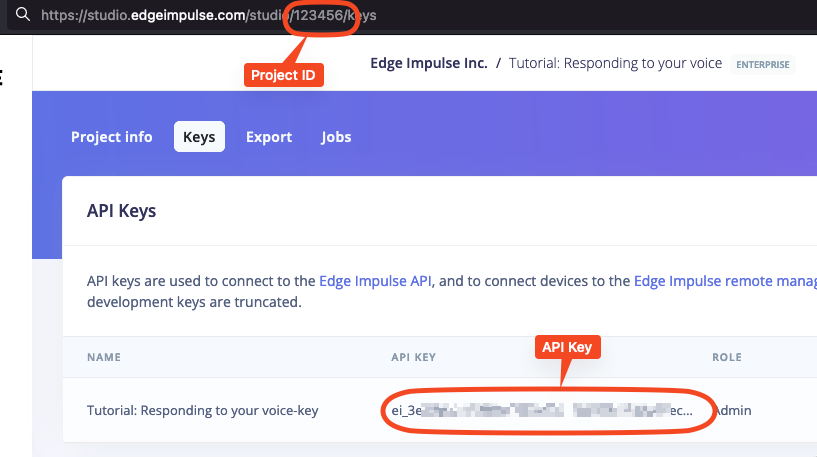
- Project ID
- Project API key
To get those, go to your project in the Studio, select Dashboard on the left pane, and then Keys on top:
This Action will trigger the build of the C++ library (zip deployment type) and download the deployment into your workflow runner. Because the filename received from the Studio depends on the project name, deployment target, and type, this name can be found later in the deployment_file_name output. You can use it later in your workflow, like in the example below.
- name: Extract the Model and SDK
  run: |
	mkdir temp
	unzip -q "${{ steps.build-deploy.outputs.deployment_file_name }}" -d temp
	mv temp/edge-impulse-sdk/ .
	mv temp/model-parameters/ .
	mv temp/tflite-model/ .
	rm -rf "${{ steps.build-deploy.outputs.deployment_file_name }}"
	rm -rf temp/
This way, your model downloaded in the form of a C++ library will get extracted into the temp directory and then moved to the current work directory.
The example above shows the default behavior of the Action (download C++ library). We can also choose a different type of deployment using the deployment_type input parameter.
Here is an example of downloading the Arduino library:
- name: Build and deploy Edge Impulse Model
     uses: edgeimpulse/build-deploy@v1
     id: build-deploy
     with:
       project_id: ${{ secrets.PROJECT_ID }}
       api_key: ${{ secrets.API_KEY }}
       deployment_type: "arduino"
How do I get to know the deployment_type?
When you are using our Studio on the browser level, it is pretty easy to find and choose the deployment type:
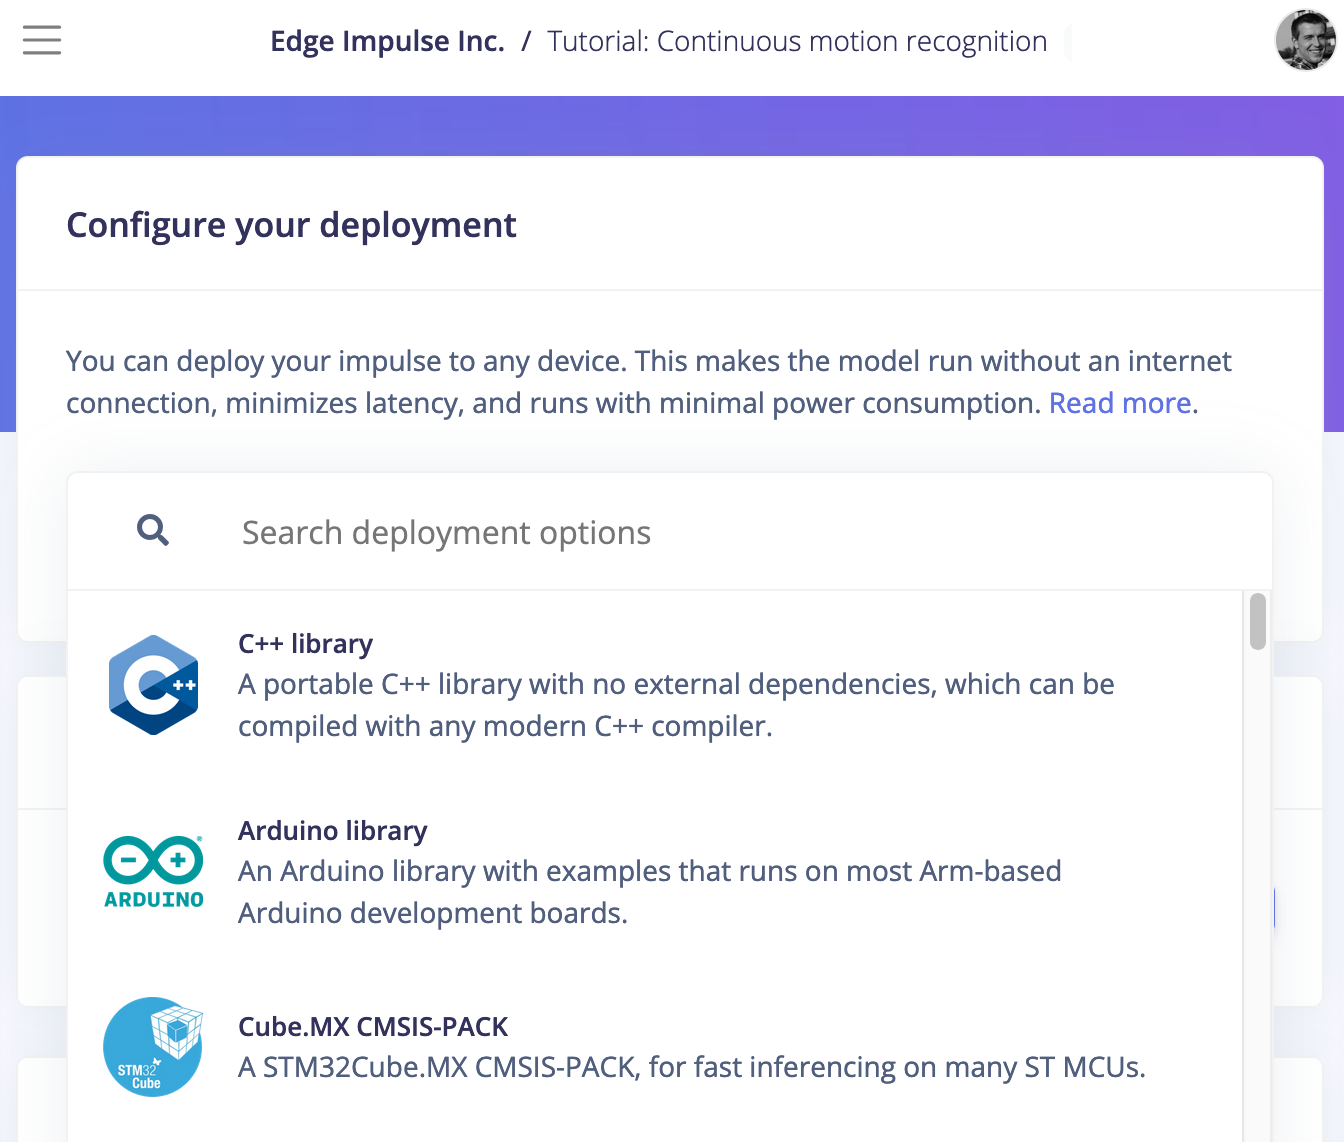
But how do you get the deployment_type value for each of those targets? Here’s where our API comes in! We can use a simple Python script that will list user-friendly names and the deployment_type.
Running this script will return you a list similar to this one:
Available libraries:
Target: C++ library
Format: zip
Target: Arduino library
Format: arduino
Target: Cube.MX CMSIS-PACK
Format: cubemx
Target: WebAssembly
Format: wasm
Target: TensorRT library
Format: tensorrt
Target: Ethos-U library
Format: ethos
The content of the list depends on your project configuration. For example, some kinds of deployments require the usage of custom DSP and/or ML blocks.
Real-world use case
As stated in the introduction, our GitHub Action may be used for CI/CD purposes. In our organization, we are using this Action for regular testing of our public examples to prevent breaking changes. It is especially useful if your application depends on multiple libraries, packages, or third-party applications. Here is an example of using the Action with Nordic Semiconductor/Zephyr inference example.
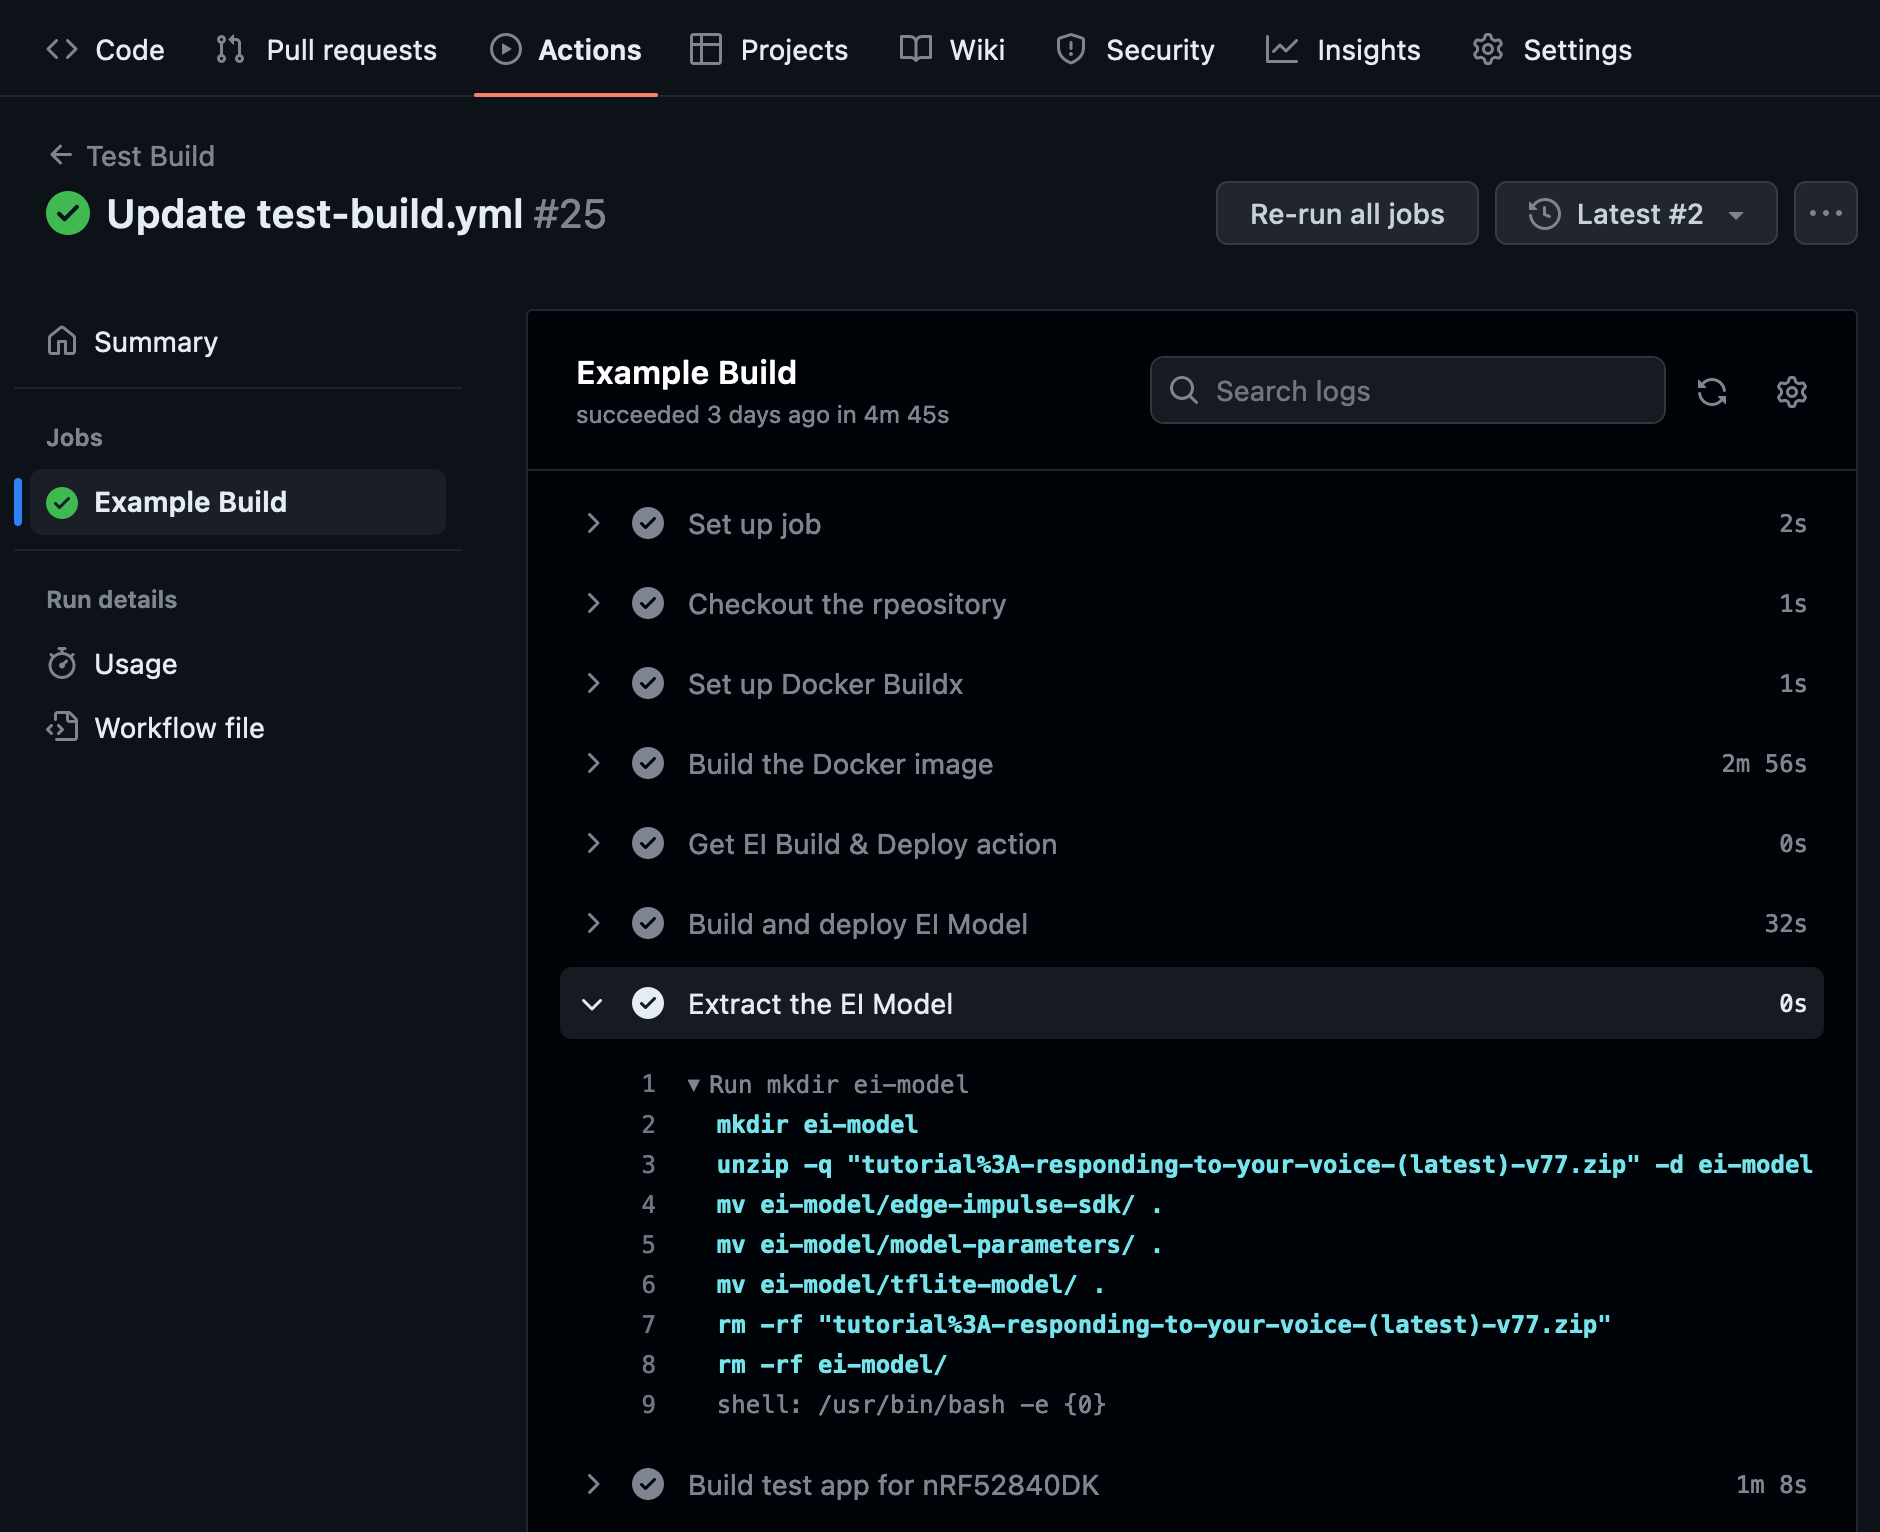
This example uses a Docker container to set up all building tools (toolchain, nRF Connect SDK):
- name: Set up Docker Buildx
id: buildx
uses: docker/setup-buildx-action@v2
- name: Build the Docker image
uses: docker/build-push-action@v4
with:
context: .
load: true
tags: zephyr-ncs-1.9.1:latest
cache-from: type=gha
cache-to: type=gha,mode=max</code></pre><p>Later, we build and deploy the model for one of our standalone examples (<a href="https://studio.edgeimpulse.com/public/14299/latest"><u>Motion recognition demo</u></a>).</p><pre><code class="language-plaintext">- name: Build and deploy EI Model
uses: ./.github/actions/build-deploy
id: build-deploy
with:
project_id: ${{ secrets.PROJECT_ID }}
api_key: ${{ secrets.API_KEY }}
- name: Extract the EI Model
run: |
mkdir ei-model
unzip -q "${{ steps.build-deploy.outputs.deployment_file_name }}" -d ei-model
mv ei-model/edge-impulse-sdk/ .
mv ei-model/model-parameters/ .
mv ei-model/tflite-model/ .
rm -rf "${{ steps.build-deploy.outputs.deployment_file_name }}"
rm -rf ei-model/</code></pre><p>Finally, we run the docker container to build the example firmware.</p><pre><code class="language-plaintext">- name: Build test app for nRF52840DK
run: |
docker run --rm -v $PWD:/app zephyr-ncs-1.9.1:latest west build -b nrf52840dk_nrf52840</code></pre><p>Thanks to GitHub Actions notification, the person responsible for the commit that created an error in workflow will be notified. </p></body></html>